![2024 Approved Taking Screenshots on Chromebook [4 Methods]](https://thmb.techidaily.com/94266fd2abffa49379e11298094d126f869b761cee72b14ccd455aec2a0df5c4.jpg)
"2024 Approved Taking Screenshots on Chromebook [4 Methods]"
Taking Screenshots on Chromebook [4 Methods]
How to Take Screenshots on A Chromebook

Max Wales
Mar 27, 2024• Proven solutions
Great for those looking for a quick-booting, budget friendly, and auto-updating alternative to the traditional PC or Mac, Chromebooks are swiftly becoming a popular alternative. Boasting a number of quirky features, such as multi-user functionality and a virus-free operating system based on Linux, Chromebooks even showcase the ability to allow users to capture screenshots in a number of different manners with ease. Within this article we’ve composed a 6-section guide on how to take a screenshot on a Chromebook, as well as how to edit them, at the touch of a button.
![]()


The All-in-One Screen Recorder & Video Editor
- Record desktop screen, voiceover, and webcam simultaneously
- Edit recorded clips quickly with a wide range of professional tools
- Built-in plentiful templates and effects
- Export to MP4, MOV, MKV, GIF and multiple formats
For Win 7 or later (64-bit)
For macOS 10.12 or later
 Secure Download
 Video Converter Factory Pro
1. Taking Screenshots on a Chromebook with a Keyboard
Similar to the typical CTRL + PrtScn or PrtScn shortcut used on most Window’s PCs, or the Command + Control + Shift + 3 shortcut used on Mac devices, taking screenshots with the use of a keyboard on a Chromebook is equally as straight forward. To capture a screenshot of the entire screen, the process requires the use of the Windows Switcher Key (look for 3 layered rectangles that resemble open tabs/windows) – this is generally located above the number 6 and 7 keys and close to the screen-brightness toggles.
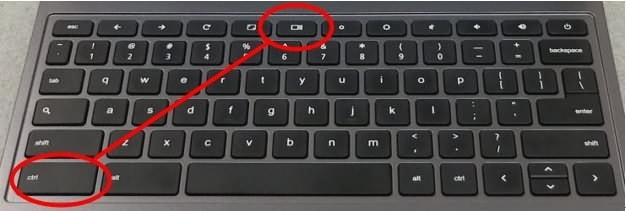
The command “**Ctrl + *Windows Switcher Key*” will capture a screenshot of your current page, and the command “Ctrl + Shift + *Windows Switcher Key***” will allow users to capture a partial screenshot with the help from a handy drag-selector tool.
Note: If your keyboard doesn’t seem to have the Screen Switcher key, try using F5 instead. To ensure your screenshot is copied into a specific document, select “Copy to Clipboard”. From here, you’ll be able to paste directly into a document.
2. Taking a Screenshot on a Chromebook with the Use of Side Buttons
Using your Chromebook in tablet mode? If so, then there’s also a handy way to make use of the screenshot feature whilst on the go. Similar to the function offered on most Smart Phone Devices, simply press both the Power and Volume Down Side Button to capture a screenshot. Unfortunately, this feature is only useful if you’re looking to capture your entire screen; you’ll need to utilize the keyboard or stylus if you’re planning to crop out a specific section.
Note: No matter whether you’re utilizing the Chromebook in either landscape or portrait mode, the Volume Rockers still remain in the same orientation, so it’s worth noting which button relates to “Volume Down”.
3. Taking a Screenshot on a Chromebook with the Use of a Stylus
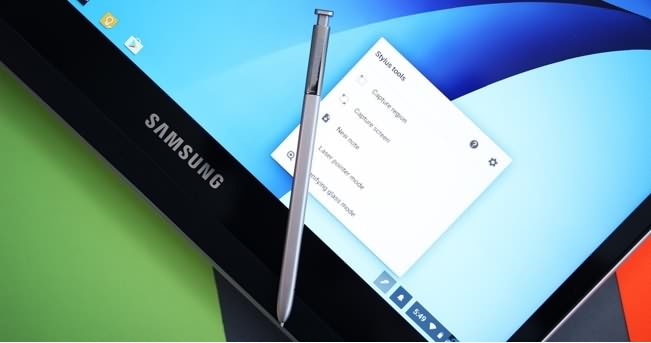
If your Chromebook features a handy stylus, then here’s how to capture a screenshot via the touchscreen functionality. Simply remove the stylus from the Chromebook and select the “Capture Screen” option from the Stylus Tool Menu (located on the lower task bar) to capture the whole screen. If you’re aiming to just capture a specific area, then simply select the “Capture Region” option. This option will allow users to highlight the particular area they’re looking to screenshot.

4. Taking a Screenshot on a Chromebook with the Use of a Third-Party App and Extension
It can often be quite time consuming to capture screenshots, edit, and save them, but there are a number of user-friendly and in-depth third-party applications and extensions on the market to help make the process a little easier. Each allowing you to capture screenshots in a stress-free manner without users even having to leave their browser, here are our Top Picks:
1. Awesome Screenshot
Considered to be potentially one of the best and most desirable in-browser screenshotting applications, Awesome Screenshot is designed with functionality in mind. Much like the methods offered through using the Windows Switcher Key or Stylus, users are offered the option to choose whether or not to capture the entire page or just a segment. What’s more, if you alter the size of your browser window you can preemptively crop your screenshots before they’ve even been captured.
With a number of simple yet effective editing features built-in, such as further resizing and cropping capabilities, as well as desirable image compression, this easy-to-use extension is perfect for users of all abilities, including bloggers and amateur screen-grabbers.
2. LightShot

Available for both Chrome, Windows, and even Mac devices, this more in-depth extension is perfect for those looking to annotate, add layers to, or modify their screen captures to more advanced levels. Although it’s not possible to capture your entire webpage with this extension, LightShot boasts the ability to take screenshots of not only your desktop but also other desired applications with 2 simple clicks of a button. The simplistic desktop saving capability and the ability to upload it direct to the LightShot server makes this application attractive to those looking for a more professional editing tool.
3. Webpage Screenshot
Offering the ability for users to capture scrolling screenshots, Webpage Screenshot is a highly desired extension. Allowing users to store an entire page worth of information thanks to its all-page capture abilities, this application was the original application for Google Chrome. With basic annotation editing, capture cropping, and optional interval inputting, this easy-to-use and straight forward extension is perfect for those looking to capture larger sections of text with ease.
Where Do I Find by Screenshots After They’re Captured?
If you’re wondering where your newly captured screenshots are disappearing to once obtained, then you need look no further than the Downloads Section of your Files App. Automatically saved, by default, in a format similar to “Screenshot 2012-08-03 at 5.18.34AM.png” your recently saved PNG file can be easily renamed as you like.
Using a Guest Account? If so, then always make sure you copy across all your important screenshots to either an SD Card or Google Drive Account before you sign out. It’s important to note that the “Downloads” Section on a Guest Account is emptied each and every time a guest logs out.
How Do I Edit My Screenshots on Chromebook?
Once you’ve captured your screenshot and it’s been automatically saved to your downloads, there are a number of simple yet effective features built-in to help you edit your image with ease. To access your saved file, simply click on the Launcher (bottom left hand corner), select the Files App Folder, then select your recently saved screenshot within the Downloaded Files section.
Once you open up your captured screenshot, you should notice there are a number of icons and actions readily available. These included editing (pencil), the ability to print (printer icon), to delete the item (trashcan), to view it as a thumbnail (collage icon), and also a slideshow option (triangle within a square). With options such as Auto-Fixing, Cropping, Brightness Adjustment, and even the ability to Rotate your saved file, users are able to simply edit their captures at a click of a button. Great for those just looking to touch up or re-jig their saved image, there are plenty of extensions available from the Web Store that offer a few more alternatives (See 4.).
Summary
In summary, there are plenty of ways to successfully capture a screenshot whilst using your Chromebook. No matter whether you prefer to use the keyboard, built-in stylus, volume rocker when in tablet mode, or the large array of purpose build extensions and applications available from the Web Store, there’s a method for each and every desire. A quick and easy way to help you capture key information, personalized messages, or even for handy file transferal, the ability to screenshot on a Chromebook has made editing files that little bit easier.
Max Wales
Max Wales is a writer and a lover of all things video.
Follow @Max Wales
Max Wales
Mar 27, 2024• Proven solutions
Great for those looking for a quick-booting, budget friendly, and auto-updating alternative to the traditional PC or Mac, Chromebooks are swiftly becoming a popular alternative. Boasting a number of quirky features, such as multi-user functionality and a virus-free operating system based on Linux, Chromebooks even showcase the ability to allow users to capture screenshots in a number of different manners with ease. Within this article we’ve composed a 6-section guide on how to take a screenshot on a Chromebook, as well as how to edit them, at the touch of a button.

![]()
The All-in-One Screen Recorder & Video Editor
- Record desktop screen, voiceover, and webcam simultaneously
- Edit recorded clips quickly with a wide range of professional tools
- Built-in plentiful templates and effects
- Export to MP4, MOV, MKV, GIF and multiple formats
For Win 7 or later (64-bit)
For macOS 10.12 or later
Secure Download
 Power Tools add-on for Google Sheets, Lifetime subscription
1. Taking Screenshots on a Chromebook with a Keyboard
Similar to the typical CTRL + PrtScn or PrtScn shortcut used on most Window’s PCs, or the Command + Control + Shift + 3 shortcut used on Mac devices, taking screenshots with the use of a keyboard on a Chromebook is equally as straight forward. To capture a screenshot of the entire screen, the process requires the use of the Windows Switcher Key (look for 3 layered rectangles that resemble open tabs/windows) – this is generally located above the number 6 and 7 keys and close to the screen-brightness toggles.
The command “**Ctrl + *Windows Switcher Key*” will capture a screenshot of your current page, and the command “Ctrl + Shift + *Windows Switcher Key***” will allow users to capture a partial screenshot with the help from a handy drag-selector tool.
Note: If your keyboard doesn’t seem to have the Screen Switcher key, try using F5 instead. To ensure your screenshot is copied into a specific document, select “Copy to Clipboard”. From here, you’ll be able to paste directly into a document.
2. Taking a Screenshot on a Chromebook with the Use of Side Buttons
Using your Chromebook in tablet mode? If so, then there’s also a handy way to make use of the screenshot feature whilst on the go. Similar to the function offered on most Smart Phone Devices, simply press both the Power and Volume Down Side Button to capture a screenshot. Unfortunately, this feature is only useful if you’re looking to capture your entire screen; you’ll need to utilize the keyboard or stylus if you’re planning to crop out a specific section.
Note: No matter whether you’re utilizing the Chromebook in either landscape or portrait mode, the Volume Rockers still remain in the same orientation, so it’s worth noting which button relates to “Volume Down”.
## 3\. Taking a Screenshot on a Chromebook with the Use of a Stylus
If your Chromebook features a handy stylus, then here’s how to capture a screenshot via the touchscreen functionality. Simply remove the stylus from the Chromebook and select the “Capture Screen” option from the Stylus Tool Menu (located on the lower task bar) to capture the whole screen. If you’re aiming to just capture a specific area, then simply select the “Capture Region” option. This option will allow users to highlight the particular area they’re looking to screenshot.
4. Taking a Screenshot on a Chromebook with the Use of a Third-Party App and Extension
It can often be quite time consuming to capture screenshots, edit, and save them, but there are a number of user-friendly and in-depth third-party applications and extensions on the market to help make the process a little easier. Each allowing you to capture screenshots in a stress-free manner without users even having to leave their browser, here are our Top Picks:
1. Awesome Screenshot
Considered to be potentially one of the best and most desirable in-browser screenshotting applications, Awesome Screenshot is designed with functionality in mind. Much like the methods offered through using the Windows Switcher Key or Stylus, users are offered the option to choose whether or not to capture the entire page or just a segment. What’s more, if you alter the size of your browser window you can preemptively crop your screenshots before they’ve even been captured.
With a number of simple yet effective editing features built-in, such as further resizing and cropping capabilities, as well as desirable image compression, this easy-to-use extension is perfect for users of all abilities, including bloggers and amateur screen-grabbers.
2. LightShot
Available for both Chrome, Windows, and even Mac devices, this more in-depth extension is perfect for those looking to annotate, add layers to, or modify their screen captures to more advanced levels. Although it’s not possible to capture your entire webpage with this extension, LightShot boasts the ability to take screenshots of not only your desktop but also other desired applications with 2 simple clicks of a button. The simplistic desktop saving capability and the ability to upload it direct to the LightShot server makes this application attractive to those looking for a more professional editing tool.
3. Webpage Screenshot
Offering the ability for users to capture scrolling screenshots, Webpage Screenshot is a highly desired extension. Allowing users to store an entire page worth of information thanks to its all-page capture abilities, this application was the original application for Google Chrome. With basic annotation editing, capture cropping, and optional interval inputting, this easy-to-use and straight forward extension is perfect for those looking to capture larger sections of text with ease.
Where Do I Find by Screenshots After They’re Captured?
If you’re wondering where your newly captured screenshots are disappearing to once obtained, then you need look no further than the Downloads Section of your Files App. Automatically saved, by default, in a format similar to “Screenshot 2012-08-03 at 5.18.34AM.png” your recently saved PNG file can be easily renamed as you like.
Using a Guest Account? If so, then always make sure you copy across all your important screenshots to either an SD Card or Google Drive Account before you sign out. It’s important to note that the “Downloads” Section on a Guest Account is emptied each and every time a guest logs out.
How Do I Edit My Screenshots on Chromebook?
Once you’ve captured your screenshot and it’s been automatically saved to your downloads, there are a number of simple yet effective features built-in to help you edit your image with ease. To access your saved file, simply click on the Launcher (bottom left hand corner), select the Files App Folder, then select your recently saved screenshot within the Downloaded Files section.
Once you open up your captured screenshot, you should notice there are a number of icons and actions readily available. These included editing (pencil), the ability to print (printer icon), to delete the item (trashcan), to view it as a thumbnail (collage icon), and also a slideshow option (triangle within a square). With options such as Auto-Fixing, Cropping, Brightness Adjustment, and even the ability to Rotate your saved file, users are able to simply edit their captures at a click of a button. Great for those just looking to touch up or re-jig their saved image, there are plenty of extensions available from the Web Store that offer a few more alternatives (See 4.).
Summary
In summary, there are plenty of ways to successfully capture a screenshot whilst using your Chromebook. No matter whether you prefer to use the keyboard, built-in stylus, volume rocker when in tablet mode, or the large array of purpose build extensions and applications available from the Web Store, there’s a method for each and every desire. A quick and easy way to help you capture key information, personalized messages, or even for handy file transferal, the ability to screenshot on a Chromebook has made editing files that little bit easier.
Max Wales
Max Wales is a writer and a lover of all things video.
Follow @Max Wales
Max Wales
Mar 27, 2024• Proven solutions
Great for those looking for a quick-booting, budget friendly, and auto-updating alternative to the traditional PC or Mac, Chromebooks are swiftly becoming a popular alternative. Boasting a number of quirky features, such as multi-user functionality and a virus-free operating system based on Linux, Chromebooks even showcase the ability to allow users to capture screenshots in a number of different manners with ease. Within this article we’ve composed a 6-section guide on how to take a screenshot on a Chromebook, as well as how to edit them, at the touch of a button.
![]()
The All-in-One Screen Recorder & Video Editor
- Record desktop screen, voiceover, and webcam simultaneously
- Edit recorded clips quickly with a wide range of professional tools
- Built-in plentiful templates and effects
- Export to MP4, MOV, MKV, GIF and multiple formats
For Win 7 or later (64-bit)
For macOS 10.12 or later
Secure Download
1. Taking Screenshots on a Chromebook with a Keyboard
Similar to the typical CTRL + PrtScn or PrtScn shortcut used on most Window’s PCs, or the Command + Control + Shift + 3 shortcut used on Mac devices, taking screenshots with the use of a keyboard on a Chromebook is equally as straight forward. To capture a screenshot of the entire screen, the process requires the use of the Windows Switcher Key (look for 3 layered rectangles that resemble open tabs/windows) – this is generally located above the number 6 and 7 keys and close to the screen-brightness toggles.
The command “**Ctrl + *Windows Switcher Key*” will capture a screenshot of your current page, and the command “Ctrl + Shift + *Windows Switcher Key***” will allow users to capture a partial screenshot with the help from a handy drag-selector tool.
Note: If your keyboard doesn’t seem to have the Screen Switcher key, try using F5 instead. To ensure your screenshot is copied into a specific document, select “Copy to Clipboard”. From here, you’ll be able to paste directly into a document.
2. Taking a Screenshot on a Chromebook with the Use of Side Buttons
Using your Chromebook in tablet mode? If so, then there’s also a handy way to make use of the screenshot feature whilst on the go. Similar to the function offered on most Smart Phone Devices, simply press both the Power and Volume Down Side Button to capture a screenshot. Unfortunately, this feature is only useful if you’re looking to capture your entire screen; you’ll need to utilize the keyboard or stylus if you’re planning to crop out a specific section.
Note: No matter whether you’re utilizing the Chromebook in either landscape or portrait mode, the Volume Rockers still remain in the same orientation, so it’s worth noting which button relates to “Volume Down”.
.png) Kanto Player Professional
Kanto Player Professional3. Taking a Screenshot on a Chromebook with the Use of a Stylus
If your Chromebook features a handy stylus, then here’s how to capture a screenshot via the touchscreen functionality. Simply remove the stylus from the Chromebook and select the “Capture Screen” option from the Stylus Tool Menu (located on the lower task bar) to capture the whole screen. If you’re aiming to just capture a specific area, then simply select the “Capture Region” option. This option will allow users to highlight the particular area they’re looking to screenshot.
 LYRX is an easy-to-use karaoke software with the professional features karaoke hosts need to perform with precision. LYRX is karaoke show hosting software that supports all standard karaoke file types as well as HD video formats, and it’s truly fun to use.
4. Taking a Screenshot on a Chromebook with the Use of a Third-Party App and Extension
It can often be quite time consuming to capture screenshots, edit, and save them, but there are a number of user-friendly and in-depth third-party applications and extensions on the market to help make the process a little easier. Each allowing you to capture screenshots in a stress-free manner without users even having to leave their browser, here are our Top Picks:
1. Awesome Screenshot
Considered to be potentially one of the best and most desirable in-browser screenshotting applications, Awesome Screenshot is designed with functionality in mind. Much like the methods offered through using the Windows Switcher Key or Stylus, users are offered the option to choose whether or not to capture the entire page or just a segment. What’s more, if you alter the size of your browser window you can preemptively crop your screenshots before they’ve even been captured.
With a number of simple yet effective editing features built-in, such as further resizing and cropping capabilities, as well as desirable image compression, this easy-to-use extension is perfect for users of all abilities, including bloggers and amateur screen-grabbers.
2. LightShot

Available for both Chrome, Windows, and even Mac devices, this more in-depth extension is perfect for those looking to annotate, add layers to, or modify their screen captures to more advanced levels. Although it’s not possible to capture your entire webpage with this extension, LightShot boasts the ability to take screenshots of not only your desktop but also other desired applications with 2 simple clicks of a button. The simplistic desktop saving capability and the ability to upload it direct to the LightShot server makes this application attractive to those looking for a more professional editing tool.
3. Webpage Screenshot
Offering the ability for users to capture scrolling screenshots, Webpage Screenshot is a highly desired extension. Allowing users to store an entire page worth of information thanks to its all-page capture abilities, this application was the original application for Google Chrome. With basic annotation editing, capture cropping, and optional interval inputting, this easy-to-use and straight forward extension is perfect for those looking to capture larger sections of text with ease.
Where Do I Find by Screenshots After They’re Captured?
If you’re wondering where your newly captured screenshots are disappearing to once obtained, then you need look no further than the Downloads Section of your Files App. Automatically saved, by default, in a format similar to “Screenshot 2012-08-03 at 5.18.34AM.png” your recently saved PNG file can be easily renamed as you like.
Using a Guest Account? If so, then always make sure you copy across all your important screenshots to either an SD Card or Google Drive Account before you sign out. It’s important to note that the “Downloads” Section on a Guest Account is emptied each and every time a guest logs out.
 Forex Robotron Basic Package
How Do I Edit My Screenshots on Chromebook?
Once you’ve captured your screenshot and it’s been automatically saved to your downloads, there are a number of simple yet effective features built-in to help you edit your image with ease. To access your saved file, simply click on the Launcher (bottom left hand corner), select the Files App Folder, then select your recently saved screenshot within the Downloaded Files section.
Once you open up your captured screenshot, you should notice there are a number of icons and actions readily available. These included editing (pencil), the ability to print (printer icon), to delete the item (trashcan), to view it as a thumbnail (collage icon), and also a slideshow option (triangle within a square). With options such as Auto-Fixing, Cropping, Brightness Adjustment, and even the ability to Rotate your saved file, users are able to simply edit their captures at a click of a button. Great for those just looking to touch up or re-jig their saved image, there are plenty of extensions available from the Web Store that offer a few more alternatives (See 4.).
Summary
In summary, there are plenty of ways to successfully capture a screenshot whilst using your Chromebook. No matter whether you prefer to use the keyboard, built-in stylus, volume rocker when in tablet mode, or the large array of purpose build extensions and applications available from the Web Store, there’s a method for each and every desire. A quick and easy way to help you capture key information, personalized messages, or even for handy file transferal, the ability to screenshot on a Chromebook has made editing files that little bit easier.
Max Wales
Max Wales is a writer and a lover of all things video.
Follow @Max Wales
Max Wales
Mar 27, 2024• Proven solutions
Great for those looking for a quick-booting, budget friendly, and auto-updating alternative to the traditional PC or Mac, Chromebooks are swiftly becoming a popular alternative. Boasting a number of quirky features, such as multi-user functionality and a virus-free operating system based on Linux, Chromebooks even showcase the ability to allow users to capture screenshots in a number of different manners with ease. Within this article we’ve composed a 6-section guide on how to take a screenshot on a Chromebook, as well as how to edit them, at the touch of a button.
![]()
The All-in-One Screen Recorder & Video Editor
- Record desktop screen, voiceover, and webcam simultaneously
- Edit recorded clips quickly with a wide range of professional tools
- Built-in plentiful templates and effects
- Export to MP4, MOV, MKV, GIF and multiple formats
For Win 7 or later (64-bit)
For macOS 10.12 or later
Secure Download
1. Taking Screenshots on a Chromebook with a Keyboard
Similar to the typical CTRL + PrtScn or PrtScn shortcut used on most Window’s PCs, or the Command + Control + Shift + 3 shortcut used on Mac devices, taking screenshots with the use of a keyboard on a Chromebook is equally as straight forward. To capture a screenshot of the entire screen, the process requires the use of the Windows Switcher Key (look for 3 layered rectangles that resemble open tabs/windows) – this is generally located above the number 6 and 7 keys and close to the screen-brightness toggles.
The command “**Ctrl + *Windows Switcher Key*” will capture a screenshot of your current page, and the command “Ctrl + Shift + *Windows Switcher Key***” will allow users to capture a partial screenshot with the help from a handy drag-selector tool.
Note: If your keyboard doesn’t seem to have the Screen Switcher key, try using F5 instead. To ensure your screenshot is copied into a specific document, select “Copy to Clipboard”. From here, you’ll be able to paste directly into a document.

2. Taking a Screenshot on a Chromebook with the Use of Side Buttons
Using your Chromebook in tablet mode? If so, then there’s also a handy way to make use of the screenshot feature whilst on the go. Similar to the function offered on most Smart Phone Devices, simply press both the Power and Volume Down Side Button to capture a screenshot. Unfortunately, this feature is only useful if you’re looking to capture your entire screen; you’ll need to utilize the keyboard or stylus if you’re planning to crop out a specific section.
Note: No matter whether you’re utilizing the Chromebook in either landscape or portrait mode, the Volume Rockers still remain in the same orientation, so it’s worth noting which button relates to “Volume Down”.
3. Taking a Screenshot on a Chromebook with the Use of a Stylus
If your Chromebook features a handy stylus, then here’s how to capture a screenshot via the touchscreen functionality. Simply remove the stylus from the Chromebook and select the “Capture Screen” option from the Stylus Tool Menu (located on the lower task bar) to capture the whole screen. If you’re aiming to just capture a specific area, then simply select the “Capture Region” option. This option will allow users to highlight the particular area they’re looking to screenshot.
4. Taking a Screenshot on a Chromebook with the Use of a Third-Party App and Extension
It can often be quite time consuming to capture screenshots, edit, and save them, but there are a number of user-friendly and in-depth third-party applications and extensions on the market to help make the process a little easier. Each allowing you to capture screenshots in a stress-free manner without users even having to leave their browser, here are our Top Picks:
1. Awesome Screenshot
Considered to be potentially one of the best and most desirable in-browser screenshotting applications, Awesome Screenshot is designed with functionality in mind. Much like the methods offered through using the Windows Switcher Key or Stylus, users are offered the option to choose whether or not to capture the entire page or just a segment. What’s more, if you alter the size of your browser window you can preemptively crop your screenshots before they’ve even been captured.
With a number of simple yet effective editing features built-in, such as further resizing and cropping capabilities, as well as desirable image compression, this easy-to-use extension is perfect for users of all abilities, including bloggers and amateur screen-grabbers.
2. LightShot
Available for both Chrome, Windows, and even Mac devices, this more in-depth extension is perfect for those looking to annotate, add layers to, or modify their screen captures to more advanced levels. Although it’s not possible to capture your entire webpage with this extension, LightShot boasts the ability to take screenshots of not only your desktop but also other desired applications with 2 simple clicks of a button. The simplistic desktop saving capability and the ability to upload it direct to the LightShot server makes this application attractive to those looking for a more professional editing tool.
3. Webpage Screenshot
Offering the ability for users to capture scrolling screenshots, Webpage Screenshot is a highly desired extension. Allowing users to store an entire page worth of information thanks to its all-page capture abilities, this application was the original application for Google Chrome. With basic annotation editing, capture cropping, and optional interval inputting, this easy-to-use and straight forward extension is perfect for those looking to capture larger sections of text with ease.
Where Do I Find by Screenshots After They’re Captured?
If you’re wondering where your newly captured screenshots are disappearing to once obtained, then you need look no further than the Downloads Section of your Files App. Automatically saved, by default, in a format similar to “Screenshot 2012-08-03 at 5.18.34AM.png” your recently saved PNG file can be easily renamed as you like.
Using a Guest Account? If so, then always make sure you copy across all your important screenshots to either an SD Card or Google Drive Account before you sign out. It’s important to note that the “Downloads” Section on a Guest Account is emptied each and every time a guest logs out.
How Do I Edit My Screenshots on Chromebook?
Once you’ve captured your screenshot and it’s been automatically saved to your downloads, there are a number of simple yet effective features built-in to help you edit your image with ease. To access your saved file, simply click on the Launcher (bottom left hand corner), select the Files App Folder, then select your recently saved screenshot within the Downloaded Files section.
Once you open up your captured screenshot, you should notice there are a number of icons and actions readily available. These included editing (pencil), the ability to print (printer icon), to delete the item (trashcan), to view it as a thumbnail (collage icon), and also a slideshow option (triangle within a square). With options such as Auto-Fixing, Cropping, Brightness Adjustment, and even the ability to Rotate your saved file, users are able to simply edit their captures at a click of a button. Great for those just looking to touch up or re-jig their saved image, there are plenty of extensions available from the Web Store that offer a few more alternatives (See 4.).
Summary
In summary, there are plenty of ways to successfully capture a screenshot whilst using your Chromebook. No matter whether you prefer to use the keyboard, built-in stylus, volume rocker when in tablet mode, or the large array of purpose build extensions and applications available from the Web Store, there’s a method for each and every desire. A quick and easy way to help you capture key information, personalized messages, or even for handy file transferal, the ability to screenshot on a Chromebook has made editing files that little bit easier.
Max Wales
Max Wales is a writer and a lover of all things video.
Follow @Max Wales
- Title: 2024 Approved Taking Screenshots on Chromebook [4 Methods]
- Author: Catherine
- Created at : 2024-07-19 15:24:22
- Updated at : 2024-07-20 15:24:22
- Link: https://desktop-recording.techidaily.com/2024-approved-taking-screenshots-on-chromebook-4-methods/
- License: This work is licensed under CC BY-NC-SA 4.0.