
"2024 Approved Top Mac Visual Seize Methods Reviewed (Limit 156 Chars)"
Top Mac Visual Seize Methods Reviewed (Limit: 156 Chars)
Top 5 Video Frame Captures for Mac

Liza Brown
Mar 27, 2024• Proven solutions
There are numerous reasons why you may want to use a video frame capture tool or software. If you are someone who likes to capture funny moments in a video, movie, or even animation, then you would need to use a tool or some software for video frame capture.
You may also want to reproduce a movie scene by images. If you are a movie buff, an ardent or aspiring technician, then you may want to spot continuity errors, you may want to study the framing, props and edit effects used in specific frames of a video. There are so many reasons why you may want video frame capture.
For Mac users, there are quite a few solutions for video frame capture. Let us explore the top five video frame capture software for Mac.
Easy-to-use video frame captures for mac
1.Wondershare Filmora [Step by Step Guide][Free]
2.QuickTime Player [Free]
3.ScreenFlow [Paid]
4.Snagit [Paid]
5.Monosnap [Free]
1. Video Frame Capture: Wondershare Filmora
Wondershare Filmora (the Latest Filmora version X) is one of the finest software to use for video frame capture. It has a very easy interface for an amateur.

 Download Mac Version ](https://tools.techidaily.com/wondershare/filmora/download/ )
- You can capture video frames from any format, like AVI, MPEG, WAV, DAT, EVO and many others.
- You can capture frames and edit them directly.
- You can export the captured and edited frames to YouTube, Vimeo, DVD and other devices or platforms without breaking a sweat.
Here I’d like to show you how to capture frames from video with Wondershare Filmora on Mac
Step1: Simply import media files
After launching Filmora, click New Project in the starting interface to create a new project and enter the main interface to import media clips. Click Import menu or the big “Import Media Files Here” menu to import the clips from Mac to Filmora.


Step2: Drag and drop the video in the timeline and play the video clip
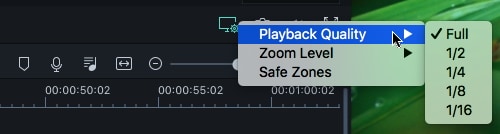
Now, you can just drag the video clip in the media library to the timeline. Filmora supports fully Integrated 4K editing, so if your footage is 4K and your Mac has a good performance, we recommend you to adjust the playback quality to Full to get a clear snapshot.

To adjust the Playback Quality settings, just click the display icon under the preview window and then select Playback Quality option to select the best quality that you need.
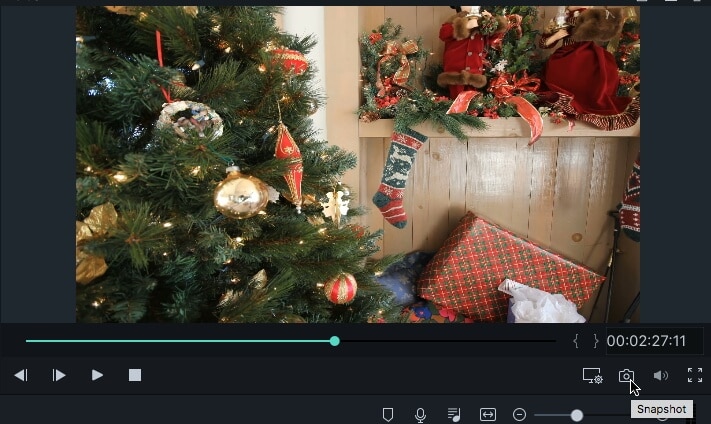
Step 3: Take snapshot
Click the icon “Snapshot”, which is under the right side of the screen within the interface. The frames will be immediately and automatically saved in Filmora Media Library.
 EmEditor Professional (Lifetime License, non-store app)
Step 4: Locate the files
To access the captured frame snapshot, just right-click the snapshot in the media library and then select Reveal in Finder, you will find it is saved in the Snapshot folders directly. You can also edit the frames as you like to make them more relevant or to convey any message you want with some text and elements.
 WonderFox DVD Ripper Pro
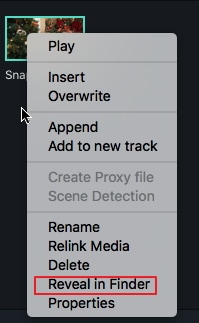
Wondershare Filmora is the easiest and the most compatible software for video frame capture, given the multiple formats you would have to deal with and given the features you have on your Mac. Also, you need some software that would get you the frames and not a hazy or impromptu screenshot. Those are always subpar in quality and there can be significant generation loss.

Download Mac Version ](https://tools.techidaily.com/wondershare/filmora/download/ )
If you want to record a game or a video, you should not miss our Best Screen Recorders for All Purposes and All Platforms
2. Video Frame Capture: QuickTime Player [Free]
You can consider QuickTime Player. It is available for free on Mac. It is the default application in Apple devices, particularly the Mac. You can record whatever’s on screen. You can also record the audio by using the microphone. You can record the full screen or a part of the screen. The instructions are easy and you can also use the camera on the Mac to capture external video using the application.
However, QuickTime Player is not ideal for screen grabs and editing or other processes are quite complicated. This is not the best solution for video frame capture.
Check out 3 popular ways for taking screenshot on Mac
3. Video Frame Capture: ScreenFlow ($99)
You can try ScreenFlow. It costs $99. You can not only initiate video frame capture but can also grab a screenshot of anything that’s on your desktop. You can zoom and crop what you have captured. There are some special features like callouts and annotations. The ScreenFlow app that is now available works in sync with iPhoto and iTunes.
The trouble is that much free software offers the same features as ScreenFlow so spending a hundred bucks doesn’t make sense.
4. Video Frame Capture: Snagit ($25)

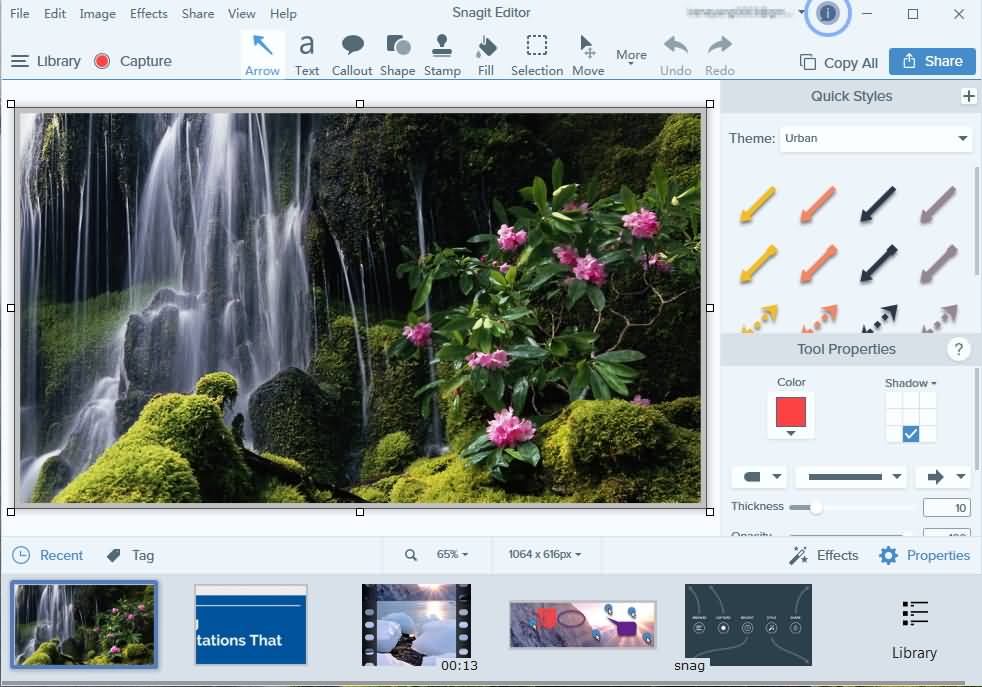
Snagit is another paid solution. It costs $25. It is not for amateurs. Capturing a screenshot is relatively simple and you also get features to help you insert the screenshot into articles or blog posts. But the interface is a little messy. In an attempt to make raw footage or captured frames readily accessible, the software really crowds up the tray. Also, despite being a paid solution it doesn’t have features to help you add connotations or titles.
5. Video Frame Capture: Monosnap [Free]
This is a free solution. It works better with short videos and quick snapshots. It is light, easy to use and it can work in sync with the integrated camera and microphone of your Mac. You can use your cloud storage to keep your screenshots or captured frames. Where Monosnap falters is the edit suite. There are very few edit features. All you can do is crop the frame you have captured. You cannot really hone your edit skills with this solution.
Conclusion
Besides taking screenshots in Filmora, you can also record the screen activities including gameplay as well. You can also add some effects, filter, overlays, transitions, elements, text and titles and audio to the screen video to make it better understood.Download Filmora now and have a try.

Liza Brown
Liza Brown is a writer and a lover of all things video.
Follow @Liza Brown
Liza Brown
Mar 27, 2024• Proven solutions
There are numerous reasons why you may want to use a video frame capture tool or software. If you are someone who likes to capture funny moments in a video, movie, or even animation, then you would need to use a tool or some software for video frame capture.
You may also want to reproduce a movie scene by images. If you are a movie buff, an ardent or aspiring technician, then you may want to spot continuity errors, you may want to study the framing, props and edit effects used in specific frames of a video. There are so many reasons why you may want video frame capture.
For Mac users, there are quite a few solutions for video frame capture. Let us explore the top five video frame capture software for Mac.
 Glary Utilities PRO - Premium all-in-one utility to clean, speed up, maintain and protect your PC
Easy-to-use video frame captures for mac
1.Wondershare Filmora [Step by Step Guide][Free]
2.QuickTime Player [Free]
3.ScreenFlow [Paid]
4.Snagit [Paid]
5.Monosnap [Free]
1. Video Frame Capture: Wondershare Filmora
Wondershare Filmora (the Latest Filmora version X) is one of the finest software to use for video frame capture. It has a very easy interface for an amateur.
Download Mac Version ](https://tools.techidaily.com/wondershare/filmora/download/ )
- You can capture video frames from any format, like AVI, MPEG, WAV, DAT, EVO and many others.
- You can capture frames and edit them directly.
- You can export the captured and edited frames to YouTube, Vimeo, DVD and other devices or platforms without breaking a sweat.
Here I’d like to show you how to capture frames from video with Wondershare Filmora on Mac
Step1: Simply import media files
After launching Filmora, click New Project in the starting interface to create a new project and enter the main interface to import media clips. Click Import menu or the big “Import Media Files Here” menu to import the clips from Mac to Filmora.
Step2: Drag and drop the video in the timeline and play the video clip
Now, you can just drag the video clip in the media library to the timeline. Filmora supports fully Integrated 4K editing, so if your footage is 4K and your Mac has a good performance, we recommend you to adjust the playback quality to Full to get a clear snapshot.
To adjust the Playback Quality settings, just click the display icon under the preview window and then select Playback Quality option to select the best quality that you need.
Step 3: Take snapshot
Click the icon “Snapshot”, which is under the right side of the screen within the interface. The frames will be immediately and automatically saved in Filmora Media Library.
Step 4: Locate the files
To access the captured frame snapshot, just right-click the snapshot in the media library and then select Reveal in Finder, you will find it is saved in the Snapshot folders directly. You can also edit the frames as you like to make them more relevant or to convey any message you want with some text and elements.
Wondershare Filmora is the easiest and the most compatible software for video frame capture, given the multiple formats you would have to deal with and given the features you have on your Mac. Also, you need some software that would get you the frames and not a hazy or impromptu screenshot. Those are always subpar in quality and there can be significant generation loss.
Download Mac Version ](https://tools.techidaily.com/wondershare/filmora/download/ )
If you want to record a game or a video, you should not miss our Best Screen Recorders for All Purposes and All Platforms
2. Video Frame Capture: QuickTime Player [Free]
You can consider QuickTime Player. It is available for free on Mac. It is the default application in Apple devices, particularly the Mac. You can record whatever’s on screen. You can also record the audio by using the microphone. You can record the full screen or a part of the screen. The instructions are easy and you can also use the camera on the Mac to capture external video using the application.
However, QuickTime Player is not ideal for screen grabs and editing or other processes are quite complicated. This is not the best solution for video frame capture.
Check out 3 popular ways for taking screenshot on Mac
3. Video Frame Capture: ScreenFlow ($99)
You can try ScreenFlow. It costs $99. You can not only initiate video frame capture but can also grab a screenshot of anything that’s on your desktop. You can zoom and crop what you have captured. There are some special features like callouts and annotations. The ScreenFlow app that is now available works in sync with iPhoto and iTunes.
The trouble is that much free software offers the same features as ScreenFlow so spending a hundred bucks doesn’t make sense.
4. Video Frame Capture: Snagit ($25)
Snagit is another paid solution. It costs $25. It is not for amateurs. Capturing a screenshot is relatively simple and you also get features to help you insert the screenshot into articles or blog posts. But the interface is a little messy. In an attempt to make raw footage or captured frames readily accessible, the software really crowds up the tray. Also, despite being a paid solution it doesn’t have features to help you add connotations or titles.

5. Video Frame Capture: Monosnap [Free]
This is a free solution. It works better with short videos and quick snapshots. It is light, easy to use and it can work in sync with the integrated camera and microphone of your Mac. You can use your cloud storage to keep your screenshots or captured frames. Where Monosnap falters is the edit suite. There are very few edit features. All you can do is crop the frame you have captured. You cannot really hone your edit skills with this solution.


Conclusion
Besides taking screenshots in Filmora, you can also record the screen activities including gameplay as well. You can also add some effects, filter, overlays, transitions, elements, text and titles and audio to the screen video to make it better understood.Download Filmora now and have a try.

Liza Brown
Liza Brown is a writer and a lover of all things video.
Follow @Liza Brown
Liza Brown
Mar 27, 2024• Proven solutions
There are numerous reasons why you may want to use a video frame capture tool or software. If you are someone who likes to capture funny moments in a video, movie, or even animation, then you would need to use a tool or some software for video frame capture.
You may also want to reproduce a movie scene by images. If you are a movie buff, an ardent or aspiring technician, then you may want to spot continuity errors, you may want to study the framing, props and edit effects used in specific frames of a video. There are so many reasons why you may want video frame capture.
For Mac users, there are quite a few solutions for video frame capture. Let us explore the top five video frame capture software for Mac.
Easy-to-use video frame captures for mac
1.Wondershare Filmora [Step by Step Guide][Free]
2.QuickTime Player [Free]
3.ScreenFlow [Paid]
4.Snagit [Paid]
5.Monosnap [Free]
1. Video Frame Capture: Wondershare Filmora
Wondershare Filmora (the Latest Filmora version X) is one of the finest software to use for video frame capture. It has a very easy interface for an amateur.
Download Mac Version ](https://tools.techidaily.com/wondershare/filmora/download/ )
- You can capture video frames from any format, like AVI, MPEG, WAV, DAT, EVO and many others.
- You can capture frames and edit them directly.
- You can export the captured and edited frames to YouTube, Vimeo, DVD and other devices or platforms without breaking a sweat.
Here I’d like to show you how to capture frames from video with Wondershare Filmora on Mac
Step1: Simply import media files
After launching Filmora, click New Project in the starting interface to create a new project and enter the main interface to import media clips. Click Import menu or the big “Import Media Files Here” menu to import the clips from Mac to Filmora.
Step2: Drag and drop the video in the timeline and play the video clip
Now, you can just drag the video clip in the media library to the timeline. Filmora supports fully Integrated 4K editing, so if your footage is 4K and your Mac has a good performance, we recommend you to adjust the playback quality to Full to get a clear snapshot.
To adjust the Playback Quality settings, just click the display icon under the preview window and then select Playback Quality option to select the best quality that you need.
Step 3: Take snapshot
Click the icon “Snapshot”, which is under the right side of the screen within the interface. The frames will be immediately and automatically saved in Filmora Media Library.
Step 4: Locate the files
To access the captured frame snapshot, just right-click the snapshot in the media library and then select Reveal in Finder, you will find it is saved in the Snapshot folders directly. You can also edit the frames as you like to make them more relevant or to convey any message you want with some text and elements.
Wondershare Filmora is the easiest and the most compatible software for video frame capture, given the multiple formats you would have to deal with and given the features you have on your Mac. Also, you need some software that would get you the frames and not a hazy or impromptu screenshot. Those are always subpar in quality and there can be significant generation loss.
Download Mac Version ](https://tools.techidaily.com/wondershare/filmora/download/ )
If you want to record a game or a video, you should not miss our Best Screen Recorders for All Purposes and All Platforms
2. Video Frame Capture: QuickTime Player [Free]
You can consider QuickTime Player. It is available for free on Mac. It is the default application in Apple devices, particularly the Mac. You can record whatever’s on screen. You can also record the audio by using the microphone. You can record the full screen or a part of the screen. The instructions are easy and you can also use the camera on the Mac to capture external video using the application.
However, QuickTime Player is not ideal for screen grabs and editing or other processes are quite complicated. This is not the best solution for video frame capture.
Check out 3 popular ways for taking screenshot on Mac
3. Video Frame Capture: ScreenFlow ($99)
You can try ScreenFlow. It costs $99. You can not only initiate video frame capture but can also grab a screenshot of anything that’s on your desktop. You can zoom and crop what you have captured. There are some special features like callouts and annotations. The ScreenFlow app that is now available works in sync with iPhoto and iTunes.
The trouble is that much free software offers the same features as ScreenFlow so spending a hundred bucks doesn’t make sense.
4. Video Frame Capture: Snagit ($25)
Snagit is another paid solution. It costs $25. It is not for amateurs. Capturing a screenshot is relatively simple and you also get features to help you insert the screenshot into articles or blog posts. But the interface is a little messy. In an attempt to make raw footage or captured frames readily accessible, the software really crowds up the tray. Also, despite being a paid solution it doesn’t have features to help you add connotations or titles.
5. Video Frame Capture: Monosnap [Free]
This is a free solution. It works better with short videos and quick snapshots. It is light, easy to use and it can work in sync with the integrated camera and microphone of your Mac. You can use your cloud storage to keep your screenshots or captured frames. Where Monosnap falters is the edit suite. There are very few edit features. All you can do is crop the frame you have captured. You cannot really hone your edit skills with this solution.
Conclusion
Besides taking screenshots in Filmora, you can also record the screen activities including gameplay as well. You can also add some effects, filter, overlays, transitions, elements, text and titles and audio to the screen video to make it better understood.Download Filmora now and have a try.
Liza Brown
Liza Brown is a writer and a lover of all things video.
Follow @Liza Brown
Liza Brown
Mar 27, 2024• Proven solutions
There are numerous reasons why you may want to use a video frame capture tool or software. If you are someone who likes to capture funny moments in a video, movie, or even animation, then you would need to use a tool or some software for video frame capture.
You may also want to reproduce a movie scene by images. If you are a movie buff, an ardent or aspiring technician, then you may want to spot continuity errors, you may want to study the framing, props and edit effects used in specific frames of a video. There are so many reasons why you may want video frame capture.
For Mac users, there are quite a few solutions for video frame capture. Let us explore the top five video frame capture software for Mac.
Easy-to-use video frame captures for mac
1.Wondershare Filmora [Step by Step Guide][Free]
2.QuickTime Player [Free]
3.ScreenFlow [Paid]
4.Snagit [Paid]
5.Monosnap [Free]
1. Video Frame Capture: Wondershare Filmora
Wondershare Filmora (the Latest Filmora version X) is one of the finest software to use for video frame capture. It has a very easy interface for an amateur.
Download Mac Version ](https://tools.techidaily.com/wondershare/filmora/download/ )
- You can capture video frames from any format, like AVI, MPEG, WAV, DAT, EVO and many others.
- You can capture frames and edit them directly.
- You can export the captured and edited frames to YouTube, Vimeo, DVD and other devices or platforms without breaking a sweat.
Here I’d like to show you how to capture frames from video with Wondershare Filmora on Mac
Step1: Simply import media files
After launching Filmora, click New Project in the starting interface to create a new project and enter the main interface to import media clips. Click Import menu or the big “Import Media Files Here” menu to import the clips from Mac to Filmora.
Step2: Drag and drop the video in the timeline and play the video clip
Now, you can just drag the video clip in the media library to the timeline. Filmora supports fully Integrated 4K editing, so if your footage is 4K and your Mac has a good performance, we recommend you to adjust the playback quality to Full to get a clear snapshot.
To adjust the Playback Quality settings, just click the display icon under the preview window and then select Playback Quality option to select the best quality that you need.
Step 3: Take snapshot
Click the icon “Snapshot”, which is under the right side of the screen within the interface. The frames will be immediately and automatically saved in Filmora Media Library.
Step 4: Locate the files
To access the captured frame snapshot, just right-click the snapshot in the media library and then select Reveal in Finder, you will find it is saved in the Snapshot folders directly. You can also edit the frames as you like to make them more relevant or to convey any message you want with some text and elements.
Wondershare Filmora is the easiest and the most compatible software for video frame capture, given the multiple formats you would have to deal with and given the features you have on your Mac. Also, you need some software that would get you the frames and not a hazy or impromptu screenshot. Those are always subpar in quality and there can be significant generation loss.
Download Mac Version ](https://tools.techidaily.com/wondershare/filmora/download/ )
If you want to record a game or a video, you should not miss our Best Screen Recorders for All Purposes and All Platforms
 Jet Profiler for MySQL, Enterprise Version: Jet Profiler for MySQL is real-time query performance and diagnostics tool for the MySQL database server. Its detailed query information, graphical interface and ease of use makes this a great tool for finding performance bottlenecks in your MySQL databases.
 2. Video Frame Capture: QuickTime Player [Free]
You can consider QuickTime Player. It is available for free on Mac. It is the default application in Apple devices, particularly the Mac. You can record whatever’s on screen. You can also record the audio by using the microphone. You can record the full screen or a part of the screen. The instructions are easy and you can also use the camera on the Mac to capture external video using the application.
However, QuickTime Player is not ideal for screen grabs and editing or other processes are quite complicated. This is not the best solution for video frame capture.
Check out 3 popular ways for taking screenshot on Mac
3. Video Frame Capture: ScreenFlow ($99)
You can try ScreenFlow. It costs $99. You can not only initiate video frame capture but can also grab a screenshot of anything that’s on your desktop. You can zoom and crop what you have captured. There are some special features like callouts and annotations. The ScreenFlow app that is now available works in sync with iPhoto and iTunes.
The trouble is that much free software offers the same features as ScreenFlow so spending a hundred bucks doesn’t make sense.
4. Video Frame Capture: Snagit ($25)
 PDF application, powered by AI-based OCR, for unified workflows with both digital and scanned documents.
Snagit is another paid solution. It costs $25. It is not for amateurs. Capturing a screenshot is relatively simple and you also get features to help you insert the screenshot into articles or blog posts. But the interface is a little messy. In an attempt to make raw footage or captured frames readily accessible, the software really crowds up the tray. Also, despite being a paid solution it doesn’t have features to help you add connotations or titles.
5. Video Frame Capture: Monosnap [Free]
This is a free solution. It works better with short videos and quick snapshots. It is light, easy to use and it can work in sync with the integrated camera and microphone of your Mac. You can use your cloud storage to keep your screenshots or captured frames. Where Monosnap falters is the edit suite. There are very few edit features. All you can do is crop the frame you have captured. You cannot really hone your edit skills with this solution.
Conclusion
Besides taking screenshots in Filmora, you can also record the screen activities including gameplay as well. You can also add some effects, filter, overlays, transitions, elements, text and titles and audio to the screen video to make it better understood.Download Filmora now and have a try.
 PCDJ DEX 3 for Windows & MAC is the total entertainment DJ software solution, offering audio, video, and karaoke mixing ability. Automatic beat-sync, smart looping, 4 decks, DJ MIDI controller support, Karaoke Streaming and much more.

Liza Brown
Liza Brown is a writer and a lover of all things video.
Follow @Liza Brown
- Title: 2024 Approved Top Mac Visual Seize Methods Reviewed (Limit 156 Chars)
- Author: Catherine
- Created at : 2024-07-19 13:49:07
- Updated at : 2024-07-20 13:49:07
- Link: https://desktop-recording.techidaily.com/2024-approved-top-mac-visual-seize-methods-reviewed-limit-156-chars/
- License: This work is licensed under CC BY-NC-SA 4.0.