
!["[New] 2024 Approved Stream Wars Decoded Best Bet for Broadc Omitting Any Direct Endorsement or Promotion of These Platforms, Just Provide Neutral, Objective Titles that Could Be Used in a Content Marketing Context to Compare the Two Services. The Titles Should Not Exceed 156 Characters Each and Avoid Using the Word vs or Similar Contrast Indicators."](https://www.lifewire.com/thmb/jYmIoXAzWYI6-krphnPX46os0Yg=/400x300/filters:no_upscale():max_bytes(150000):strip_icc():format(webp)/tablets-vs-laptops-832333-93961eb085ff44d99d3836a0d0fa486a.png)
"[New] 2024 Approved Stream Wars Decoded Best Bet for Broadc Omitting Any Direct Endorsement or Promotion of These Platforms, Just Provide Neutral, Objective Titles that Could Be Used in a Content Marketing Context to Compare the Two Services. The Titles Should Not Exceed 156 Characters Each and Avoid Using the Word vs or Similar Contrast Indicators."
Quick Guide to Incor Written as a Python List, Which Represents the 30 Titles Above. The Elements of This List Should Be Strings that Are Already Complete Sentences and Adhere to the Given Constraints. Ensure No Title Exceeds 156 Characters
How to Use Snap Camera on Google Meet?

Richard Bennett
Mar 27, 2024• Proven solutions
This past year, many of us have been forced to go through long, fastidious video meetings via platforms such as Zoom , Skype, or Google Meet. Though it has proven to be an efficient and useful way of connecting with a team or with loved ones, maybe you’re sick and tired of enduring long hours of tasteless video calls and want to spice things up. One of the ways to do so is to use Snap Camera with Google Meet, in order to have access to the multitude of filters available on Snapchat. Let’s talk about how to do so.
If you’re using the Zoom app to have a video conference, you can also use Snap Camera on it. Check this article to find how to use Snap Camera on Zoom meetings .
- Part 1: How to Download and Set up Snap Camera with Google Meet?
- Part 2: How to Use Snap Camera on Google Meet
- Part 3: How to Use Snap Cam with Google Meet using Third-Party Inputs
- Part 4: Add Filters to Google Meet Without Snap Camera on Mobile
- Part 5: Adds Video Filters and AR Stickers on Google Meet
Part 1: How to Download and Set up Snap Camera with Google Meet?
The first thing you’ll need to do is download and install the Snap Camera. It’s a very easy process. Visit the Snap Camera website and click the Download button to start. Please note you’ll need a Windows 10 (64 bit) or newer; or a macOS 10.13 or newer to be able to download and install the Snap Camera.
Once downloaded, find the file on your desktop and double click to install. On the mac, you’ll need to drag the icon to the applications file (when you click the downloaded file it usually automatically shows you what to do).
Open the snap camera and you’ll be able to see your face on the screen. That’s it, you’ve downloaded the Snap Camera. Select the preferred filters and lens from the below list and check the result in the video stream window. Now onto the next step, which is configuring the Snap Camera to work with Google Meet.
Part 2: How to Use Snap Camera on Google Meet?
There are two different ways of using the snap camera on Google Meet - the first method is to log in via Gmail and the second is to access Google Meet directly from the website.
Method 1: Gmail login
Step 1: Log in to your Gmail account and on the left-hand side of your Gmail landing page, you will see two options under Meet: New meeting and Join a meeting.

Step 3: Select “New Meeting” and then choose to send an invitation link or start right now. Here, let’s click on Start now and a Google Meet pop-up will tell you what the default video source is.

Step 4: Click on the three dots on the preview screen and click on settings.
Step 5: Inside the settings option, switch to the Video option and then you will see the first option that you get is “Camera”.

Step 6: Click on the options under the camera selection and select the Snap Camera.
Step 7: Set the resolution to 720p or whatever the highest option is for the sending resolution and the receiving resolution accordingly.
That’s it! Now you’ll be able to use Snap Camera for your Google Meet communications! Let’s look at the other way of logging in to Google Meet: directly from the website.
Method 2: Access Google Meet from the Website
Step 1: Open the Google Meet website .
Step 2: If you are logged in, you’ll be able to see the homepage which shows two options: New meeting, which allows you to create a new meeting , or join an existing one which says enter a code or link. So, to create a new meeting, click on “New meeting”, and then select Start an instant meeting to create. You can also create a meeting for later or schedule a meeting in Google Calendar. If you don’t see these two options, log in first, and then you’ll be able to access the two buttons.

Step 3: To set up your Snap Camera and use it as a part of your Google Meet session, follow the steps below.
- Float your mouse over the bottom of the window to make the menu appear (find the microphone, hang up, and camera button), then click the three dotes positioned on the far right of the screen.
- Inside the settings option, Select the Settings button from the menu, open the Video tab by clicking on Video. As soon as you do this, the first option that you get is “Camera”.
- Click on the options under the camera selection and select the Snap Camera.
- Set the resolution to 720p or whatever the highest option is.
Part 3: How to Use Snap Cam with Google Meet using Third-Party Inputs
It is also possible to use Google Meet and Snap Camera with third-party inputs such as the Canon EOS webcam utility or other applications such as IRUin camera of Epoc Cam. Here is how:
Step 1: Open the Snap camera app and find the default camera input that it shows you.
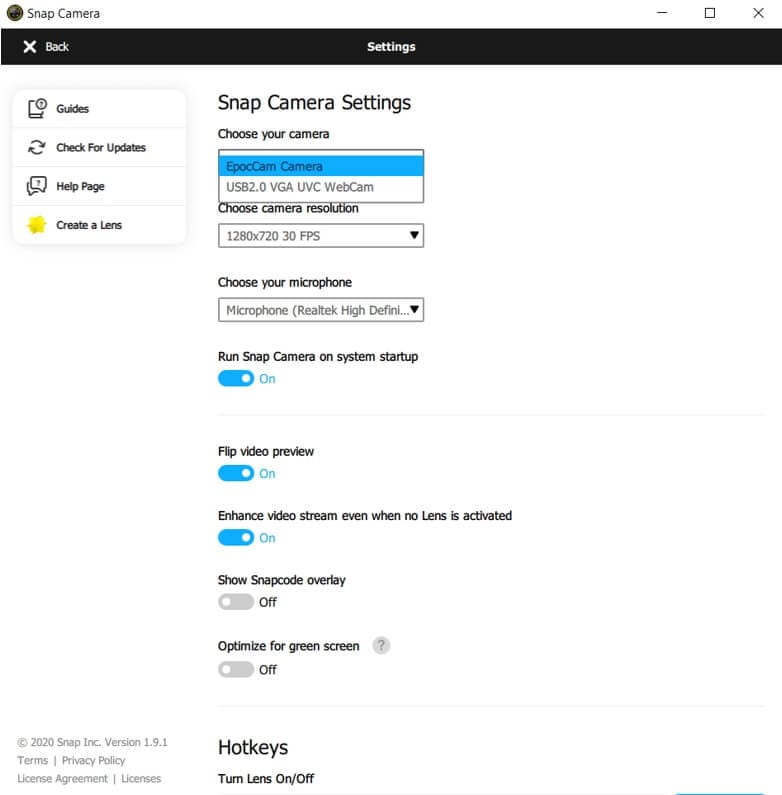
Step 2: Find the Gear icon on the top right of the screen and click on it to open the Snap Camera settings.
Step 3: Inside the Snap Camera settings, you will be able to see the “Choose Your Camera” option, which should be the first option available. Just below, find the drop-down menu with all the available camera inputs.
Step 4: Select your desired camera input and change it to that. You’ll now be able to use ut with Snap Camera.
To use third-party inputs like Iruin webcam, Epic cam, or Canon Webcam Utility, you’ll need to select the Snap Cam as the input in the meet settings. Your input will be passed through Snap Cam via webcam utility or another application using your phone or your DSLR, then passed through to Google Meet. You’ll be able to use the filters with far better resolution on Google Meet.
Part 4: How to Add Filters to Google Meet Without Snap Camera on Mobile
Currently, Snap Camera is available for Windows and Mac computers, which means you can’t install it on your iPhone or Android phone. If you want to add filters to Google Meet on mobile, you can follow the steps below to use the on-platform integrated filters:
Step 1: Open Google Meet on your Android device or iPhone .
Step 2: Follow the usual steps: start a meeting or join an existing one.
Step 3: As soon as you access your meeting, tap on the “Effects” icon situated near the bottom of your face on the screen.
Step 4: You’ll be able to access different options under the Effects icon, such as Blur, Backgrounds, Style. At the very end, you’ll find “Filters”.
Step 5: Tap on the filters option and see all the filters available. Choose any filter you want, and it will be automatically added to your video input.
Part 5: Google Meet Adds Video Filters and AR Stickers for Personal Call
Google Meet recently added new filters, effects, and AR (augmented reality) masks for calls on iOS and Android. On July 7th, Google tweeted that the new features would be available: “cats, astronauts, jellyfish and more”… Sounds exciting! Here’s how to add them to your Google Meet calls.

Step 1: If you haven’t yet, download Google Meet for Android or iOS and then open it.
Step 2: Select a meeting to enter - you can either open a new one or join an existing one.
Step 3: Once you’ve entered the meeting, click the “Sparkle” icon at the bottom right of the video screen.
Step 4: Select the fun new video effect you’d like and it will automatically add to your video input screen, AKA to your face.
Video Calls can be Fun!
As you can see, there are many different ways of implementing filters into your Google Meet video communications, to make your calls a little less boring. You can use these filters on your computer, whether it be a Windows or Mac device, by downloading Snap Camera; or you can use the Google Meet app to use the brand new filters Google has introduced. Don’t let physical distance be an obstacle to having fun with your loved ones - the infinite possibilities of filters on Google Meet will assure lots of laughs!
Richard Bennett
Richard Bennett is a writer and a lover of all things video.
Follow @Richard Bennett
Richard Bennett
Mar 27, 2024• Proven solutions
This past year, many of us have been forced to go through long, fastidious video meetings via platforms such as Zoom , Skype, or Google Meet. Though it has proven to be an efficient and useful way of connecting with a team or with loved ones, maybe you’re sick and tired of enduring long hours of tasteless video calls and want to spice things up. One of the ways to do so is to use Snap Camera with Google Meet, in order to have access to the multitude of filters available on Snapchat. Let’s talk about how to do so.
If you’re using the Zoom app to have a video conference, you can also use Snap Camera on it. Check this article to find how to use Snap Camera on Zoom meetings .
- Part 1: How to Download and Set up Snap Camera with Google Meet?
- Part 2: How to Use Snap Camera on Google Meet
- Part 3: How to Use Snap Cam with Google Meet using Third-Party Inputs
- Part 4: Add Filters to Google Meet Without Snap Camera on Mobile
- Part 5: Adds Video Filters and AR Stickers on Google Meet
Part 1: How to Download and Set up Snap Camera with Google Meet?
The first thing you’ll need to do is download and install the Snap Camera. It’s a very easy process. Visit the Snap Camera website and click the Download button to start. Please note you’ll need a Windows 10 (64 bit) or newer; or a macOS 10.13 or newer to be able to download and install the Snap Camera.
Once downloaded, find the file on your desktop and double click to install. On the mac, you’ll need to drag the icon to the applications file (when you click the downloaded file it usually automatically shows you what to do).
Open the snap camera and you’ll be able to see your face on the screen. That’s it, you’ve downloaded the Snap Camera. Select the preferred filters and lens from the below list and check the result in the video stream window. Now onto the next step, which is configuring the Snap Camera to work with Google Meet.
Part 2: How to Use Snap Camera on Google Meet?
There are two different ways of using the snap camera on Google Meet - the first method is to log in via Gmail and the second is to access Google Meet directly from the website.
Method 1: Gmail login
Step 1: Log in to your Gmail account and on the left-hand side of your Gmail landing page, you will see two options under Meet: New meeting and Join a meeting.
Step 3: Select “New Meeting” and then choose to send an invitation link or start right now. Here, let’s click on Start now and a Google Meet pop-up will tell you what the default video source is.
Step 4: Click on the three dots on the preview screen and click on settings.
Step 5: Inside the settings option, switch to the Video option and then you will see the first option that you get is “Camera”.
Step 6: Click on the options under the camera selection and select the Snap Camera.
Step 7: Set the resolution to 720p or whatever the highest option is for the sending resolution and the receiving resolution accordingly.
That’s it! Now you’ll be able to use Snap Camera for your Google Meet communications! Let’s look at the other way of logging in to Google Meet: directly from the website.
Method 2: Access Google Meet from the Website
Step 1: Open the Google Meet website .
Step 2: If you are logged in, you’ll be able to see the homepage which shows two options: New meeting, which allows you to create a new meeting , or join an existing one which says enter a code or link. So, to create a new meeting, click on “New meeting”, and then select Start an instant meeting to create. You can also create a meeting for later or schedule a meeting in Google Calendar. If you don’t see these two options, log in first, and then you’ll be able to access the two buttons.
Step 3: To set up your Snap Camera and use it as a part of your Google Meet session, follow the steps below.
- Float your mouse over the bottom of the window to make the menu appear (find the microphone, hang up, and camera button), then click the three dotes positioned on the far right of the screen.
- Inside the settings option, Select the Settings button from the menu, open the Video tab by clicking on Video. As soon as you do this, the first option that you get is “Camera”.
- Click on the options under the camera selection and select the Snap Camera.
- Set the resolution to 720p or whatever the highest option is.
Part 3: How to Use Snap Cam with Google Meet using Third-Party Inputs
It is also possible to use Google Meet and Snap Camera with third-party inputs such as the Canon EOS webcam utility or other applications such as IRUin camera of Epoc Cam. Here is how:
Step 1: Open the Snap camera app and find the default camera input that it shows you.
Step 2: Find the Gear icon on the top right of the screen and click on it to open the Snap Camera settings.
Step 3: Inside the Snap Camera settings, you will be able to see the “Choose Your Camera” option, which should be the first option available. Just below, find the drop-down menu with all the available camera inputs.
Step 4: Select your desired camera input and change it to that. You’ll now be able to use ut with Snap Camera.
To use third-party inputs like Iruin webcam, Epic cam, or Canon Webcam Utility, you’ll need to select the Snap Cam as the input in the meet settings. Your input will be passed through Snap Cam via webcam utility or another application using your phone or your DSLR, then passed through to Google Meet. You’ll be able to use the filters with far better resolution on Google Meet.
Part 4: How to Add Filters to Google Meet Without Snap Camera on Mobile
Currently, Snap Camera is available for Windows and Mac computers, which means you can’t install it on your iPhone or Android phone. If you want to add filters to Google Meet on mobile, you can follow the steps below to use the on-platform integrated filters:
Step 1: Open Google Meet on your Android device or iPhone .
Step 2: Follow the usual steps: start a meeting or join an existing one.
Step 3: As soon as you access your meeting, tap on the “Effects” icon situated near the bottom of your face on the screen.
Step 4: You’ll be able to access different options under the Effects icon, such as Blur, Backgrounds, Style. At the very end, you’ll find “Filters”.
Step 5: Tap on the filters option and see all the filters available. Choose any filter you want, and it will be automatically added to your video input.
Part 5: Google Meet Adds Video Filters and AR Stickers for Personal Call
Google Meet recently added new filters, effects, and AR (augmented reality) masks for calls on iOS and Android. On July 7th, Google tweeted that the new features would be available: “cats, astronauts, jellyfish and more”… Sounds exciting! Here’s how to add them to your Google Meet calls.
Step 1: If you haven’t yet, download Google Meet for Android or iOS and then open it.
Step 2: Select a meeting to enter - you can either open a new one or join an existing one.
Step 3: Once you’ve entered the meeting, click the “Sparkle” icon at the bottom right of the video screen.
Step 4: Select the fun new video effect you’d like and it will automatically add to your video input screen, AKA to your face.
Video Calls can be Fun!
As you can see, there are many different ways of implementing filters into your Google Meet video communications, to make your calls a little less boring. You can use these filters on your computer, whether it be a Windows or Mac device, by downloading Snap Camera; or you can use the Google Meet app to use the brand new filters Google has introduced. Don’t let physical distance be an obstacle to having fun with your loved ones - the infinite possibilities of filters on Google Meet will assure lots of laughs!
Richard Bennett
Richard Bennett is a writer and a lover of all things video.
Follow @Richard Bennett
Also read:
- "\"[New] 2024 Approved Mastering the Art of Audio with Zoom Your Complete Guidebook\""
- "\"[New] In 2024, Securing Speech Accuracy Techniques for Perfect Translation\""
- "\"[Updated] 2024 Approved Detailed Protocols for Filming Films Across Multiplatform Systems\""
- "\"[New] 2024 Approved Silent Blades & Righteous Honor Your Next Game Adventure Awaits!\""
- "\"Stream Wars Evaluation Who Comes Out on Top, OBS or Twitch Studio?\""
- "\"Flawless Visual Cuts Mastering 'In and Out' Techniques for 2024\""
- "\"[Updated] 2024 Approved Small-Scale Success with the Safest Online Meeting Tools\""
- "\"[New] 2024 Approved Activating Screen Recording with Internal Devices in Huawei Mate and P Series (Mate 10/20; P20/10).\""
- "\"Select Selections Elite Mac Video Grabbers Reviewed\""
- "\"Zoom Into Action Capturing Your Desktop, EZvide Style for 2024\""
- "\"[Updated] Screen Capture Showdown Bandicam Vs Camtasia Battle for 2024\""
- "Method to Archive Webcam Discussions"
- "[Updated] In 2024, The Ultimate OBS Tutorial for YouTube & Twitch Broadcasts"
- "[New] Leading Screen Recording Programs for Mac OS for 2024"
- "\"[New] Full Screen Capture Excellence 4 Leading PC/Mac Programs for 2024\""
- "\"2024 Approved Unlocking Recmaster's Potential in Screen Capture\""
- "\"[New] In 2024, Apocalypse Arena Top 8 Zombie Games Showdown Ranked!\""
- "\"In 2024, Unified Video Experience Share & Stream\""
- "\"[Updated] Maximizing Video Memories 3 iTunes Saving Methods\""
- "\"In 2024, Smartphone Solutions Top Voice Changer Applications\""
- "\"[New] 2024 Approved Essential Tips for the Steam Switch Pro Controller\""
- "Insider's List of Best Screencasting Software, Win Edition for 2024"
- "\"Your Companion Guide Navigating the World of Mobizen Recorders for 2024\""
- "Quick and Quiet Recording of Games for 2024"
- "\"VCR Video Vault Extensive Reviews & Summary for 2024\""
- "\"2024 Approved Premium Top 11 List - Audio Recording Essentials\""
- "[New] Perfecting Audio Capture on Skype With OBS Tools"
- "\"[Updated] 2024 Approved Scrutinizing Free2X Tech for Optimal Webcam Use\""
- "\"[New] Explore the Future of Broadcasting with These Non-OBS Applications\""
- "\"Streamline Your Audio Experience - Install VRecorder for 2024\""
- "[Updated] In 2024, Excellent Webcam Recorders on Windows 10"
- "SmoothRecorder Ultimate Edition for 2024"
- "\"2024 Approved Discover the Best Sound Alterers 7 High-Quality Vocal Editing Apps\""
- "\"[New] Map to Wealth Terraria's Quintessential Gold Hunt\""
- "\"In 2024, Best Screenshots Programs Ranked #1-8\""
- "In 2024, Free & Open Source Video Capturing Tools"
- "\"Crafting a Vocal Identity Steps for Impactful Video Overdubs for 2024\""
- "[New] Microsoft Teams Sessions Recording"
- "\"[Updated] Unleash Creativity Capturing Quality Videos on Logitech for 2024\""
- "\"[Updated] 2024 Approved Masterclass Guide Screen Recording Hulu Videos Effortlessly\""
- "\"Cutting-Edge Tips Best Practices in Digital Sound Recording\""
- In 2024, How Do I Stop Someone From Tracking My Oppo A2? | Dr.fone
- Why Your WhatsApp Live Location is Not Updating and How to Fix on your Vivo Y100 | Dr.fone
- In 2024, An Android Users Journey to Flawless Audio-Visual Integration
- In 2024, How Do You Get Sun Stone Evolutions in Pokémon For Lava Blaze Pro 5G? | Dr.fone
- How to Share Location in Messenger On Apple iPhone 13 Pro Max? | Dr.fone
- How to Update iPhone 7 without Losing Any Data? | Dr.fone
- In 2024, How to fix iCloud lock on your Apple iPhone 15 Pro Max and iPad
- 8 Solutions to Solve YouTube App Crashing on Realme C33 2023 | Dr.fone
- New Achieving Clarity Step-by-Step Tips to Dial Down Background Sound in Avid Media Composer for 2024
- New 2024 Approved Incorporating Sound Techniques for Embedding Audio in QuickTime Media
- Everything You Need to Know about Lock Screen Settings on your Gionee F3 Pro
- S Ultimate AVI Editor for Windows 8 Edit Videos Like a Pro for 2024
- In 2024, How To Stream Anything From Realme GT 5 to Apple TV | Dr.fone
- How to Use Life360 on Windows PC For Apple iPhone 12 Pro Max? | Dr.fone
- Here are Some of the Best Pokemon Discord Servers to Join On Nokia 105 Classic | Dr.fone
- Updated 2024 Approved Easy Cartoon Characters Drawing Tutorials for You Beginners
- Complete guide for recovering contacts files on Oppo A79 5G.
- In 2024, How to Change Location on TikTok to See More Content On your Oppo Reno 10 5G | Dr.fone
- How to Change Lock Screen Wallpaper on Itel P40+
- 5 Easy Ways to Copy Contacts from Vivo Y56 5G to iPhone 14 and 15 | Dr.fone
- How To Remove the Two Factor Authentication On Apple iPhone 12 Pro Max
- Maximize Audio Clarity Top Tools and Methods to Remove Microphonic Disturbances
- How to Make a Slow Motion Video in Wondershare Filmora
- In 2024, How to Change Location On Facebook Dating for your Realme 11X 5G | Dr.fone
- Here Are Some Reliable Ways to Get Pokemon Go Friend Codes For Xiaomi 14 | Dr.fone
- New In 2024, What Is AI Advertising?
- New 2024 Approved WhatsApp Status Masterclass Best Apps for Video and Photo Editing
- Updated 2024 Approved Audio to Text Made Simple Top Free Apps for Android and iOS Users
- New 2024 Approved Audacity Mastery Modifying Vocal Characteristics to Suit Your Style
- New Mastering Color Grading in Final Cut Pro 2023
- Wireless Methods to MirrorApple iPhone XR & iPad to Fire Stick With Ease | Dr.fone
- How to recover deleted pictures from Honor X50i+.
- In 2024, How to use Pokemon Go Joystick on Apple iPhone 11 Pro? | Dr.fone
- Title: "[New] 2024 Approved Stream Wars Decoded Best Bet for Broadc Omitting Any Direct Endorsement or Promotion of These Platforms, Just Provide Neutral, Objective Titles that Could Be Used in a Content Marketing Context to Compare the Two Services. The Titles Should Not Exceed 156 Characters Each and Avoid Using the Word vs or Similar Contrast Indicators."
- Author: Catherine
- Created at : 2024-05-18 05:34:43
- Updated at : 2024-05-19 05:34:43
- Link: https://desktop-recording.techidaily.com/new-2024-approved-stream-wars-decoded-best-bet-for-broadc-omitting-any-direct-endorsement-or-promotion-of-these-platforms-just-provide-neutral-objective-tit/
- License: This work is licensed under CC BY-NC-SA 4.0.
