![[New] Minimalist OBS Adjustments for Under-$500 PCs for 2024](https://thmb.techidaily.com/526587f9f9083224ba90b469fae9f684a8ef66dad7a99594a73a26d6b57f4450.jpg)
"[New] Minimalist OBS Adjustments for Under-$500 PCs for 2024"
Minimalist OBS Adjustments for Under-$500 PCs
In the past two decades, the digital and IT industry is growing at a jet pace. Programmers are inventing more applications to make our life easier. Similarly, the invention of youtube is one of its prevalent examples of all inventions. Billions of people are watching youtube, among them, millions are video streamers. Today Youtubers and other platform streamers are building costly computational machines to stream their videos with high resolutions and frames per second but it’s not the case for everyone like you and I cannot afford to build those high-end PC or Laptops.
Therefore, after vast research on the internet, our team came up with an optimal solution to show you a way to stream your videos lag-free, jitter-free, and without any blurriness in a costless way possible. We recommend you the best studio software known as OBS for your streaming using the best OBS settings for your low-end PC or a Laptop. These OBS settings will let you record videos for low-end PC or laptops to stream now without any issues. Keeping things in a little hurry let’s straight dive into the real stuff of this article.
1. Video Settings
Since we are concerned about the streaming of video. It is important to know how to set up your videos settings. To set your video settings you need to follow the steps given below.

Step 1: Go to Settings
First, you will need to launch your OBS software. On the main menu, you have to go to file-> settings. You will see a new window will pop up for settings as shown in the figure below.
 LYRX is an easy-to-use karaoke software with the professional features karaoke hosts need to perform with precision. LYRX is karaoke show hosting software that supports all standard karaoke file types as well as HD video formats, and it’s truly fun to use.
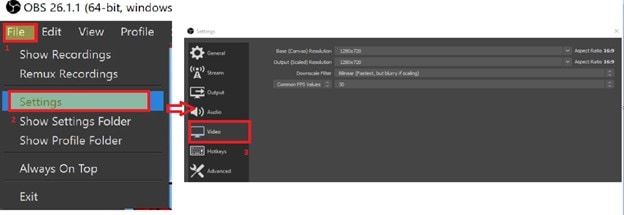
Step 2: Settings That You Should Keep
Starting with base resolution, it is the video resolution that we are going to send to the people who are going to watch our stream. So for the best one, click on it and choose 1280*720.
Output tab, which is the resolution of the video that the people will watch. For fast and lag-free streaming it’s best to keep both the output and base resolution the same to avoid any conversion between the resolution by CPU. So click on output resolution and choose 1280*720 again. If you noticed your computer is still lagging then it’s best to change to 480p but below this, it’s not recommended.
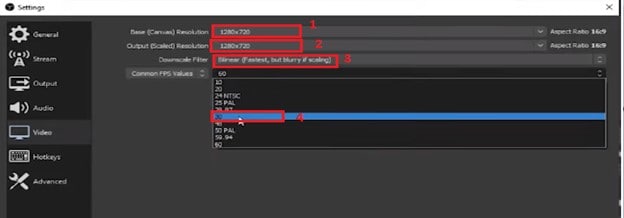
After that, it comes to the filter option. There are multiple filter options in this tab but for a fast and better result, you have to choose the “bilinear” filter as shown in the figure below. Finally, when it comes to frame per second you gotta be careful here. The more the fps the more it will put load on your CPU means it will become laggy but it is best to keep it 30 fps, not more than this and not less than this if you are using a low-end PC or Laptop.
Step 3: Output Settings
Once you are done with the general video settings now it’s time you should come to the output settings. For that, you will need to choose the output from the main vertical tab as shown in the figure below in 1. You will see a new window appears with a variety of settings. Now it’s time to choose the advanced setting as shown in 2 in the figure to see all settings to be edited.
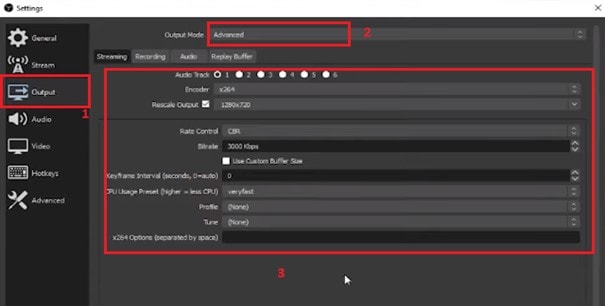
Let’s move towards the detail settings for the output video for your audience it’s best to choose the settings shown in the figure and below for lag-free and jitter-free video.
Encoder:
The first setting is the encoder setting for your output video. There are two options for it, if you are not using any NVidia graphics card and relying on CPU then it is best to choose x264, which will utilize your CPU.
Rescale Output:
The rescale output settings should be kept the same as 720p of the video you are streaming.
Rate Control:
Keep the rate control CBR.
Bitrate:
Normally, for low-end PCs, you should keep the bitrate to 3000 kbps. However, if you are finding it struggling with your PC in the form of a lag or jitteriness then it’s recommended to drop it low till you get the better results. For the NVIDIA card keep the bitrate to 3000 as it is perfectly fine for it.
CPU Usage Preset:
It comes with a lot of options to keep your CPU usage for the video. It is best recommended to keep the CPU usage very fast for good results. If you are using an NVIDIA graphics card then it is best to change the CPU usage to “performance” to get the best out of your machine.
Profile:
By default, the profile option is disabled and you should keep these settings as it is if you are not using the NVIDIA card but if it’s not so then it’s recommended to choose the “main” on the profiling option.
So that’s it for the video settings. These are all the settings that you need to adjust before streaming. After doing it so you just need to click apply button below and bingo it is done.
2. Audio Settings
For a clear and better audio performance, it’s also necessary you keep the optimum settings for the audio too. Well, you don’t have to worry now about the audio too. After reading this article you should keep the same audio settings here for your PC or Laptop.
Step 1: Output Audio
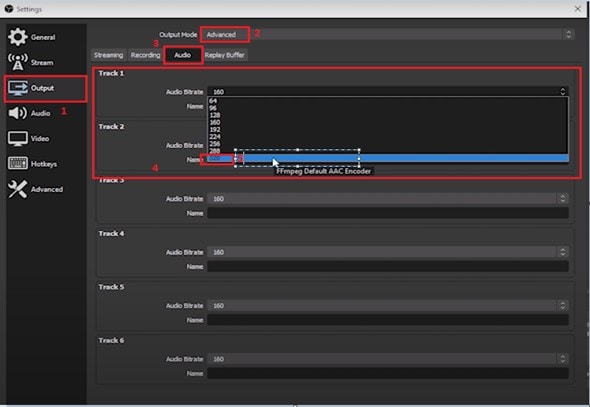
The audio settings can be adjusted from two places. Let us discuss the first one. For that, you will need to select the output in the vertical tab and go to audio as shown in the figure below. You will see multiple tracks in these windows. It contains the audio settings for multiple sources. However, if you are using a single it’s good to choose 320 in track one. For multiple, there is no need to change the audio track but to keep the same 320. These are the perfect settings for most cases of the audio settings for your computer.
Step 2: Audio Tab Settings
The audio consists of many settings,it is divided into categories lets start one by one and explain it.
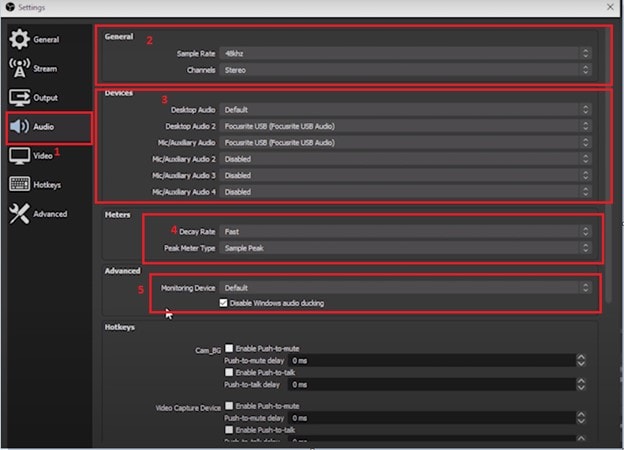
Sample Rate and Channels:
It is the resolution of the audio. The more the sampling rate the more the bits of the audio you sent which means the more the quality of the audio improves. However, there is no need to keep it high but an optimum value works well too. Therefore, keep it 48khz for the best result as shown. Another thing is a channel, which contains a lot of options but most of you will want the “stereo” since it’s the most common choice from the streamers.
Desktop Audios:
The desktop audio depends on the device you are using for the audio. It is best to use the default if you don’t know about your device otherwise choose USB if you are audio uses the USB port. For the second audio source, you can choose desktop audio 2 and set it accordingly.
Auxiliary Audio:
The streamers usually have one mic source but if you have multiple mic sources then you choose up to 4 auxiliary audio ports and set the device’s settings.
Meter: Decay Rate & Peak Meter Type:
The meter is a decibel meter (dB). It is a measurement of volume. The more the decibels, the more it is loud. So use the decay rate to choose between fast, medium, and slow volumes accordingly to your needs. The Peak Meter type is used for your CPU usage. IF you have set higher CPU usage then go for the “true peak” otherwise chose “sample peak”.
Finally, the rest of the options should be kept as default since being a streamer you won’t need them to change and they are pretty much basic hotkeys to set up if you wish to.
3. Stream Settings
Here are the streaming settings that you just need to follow for your streaming videos. The streaming tab consists of settings for the platform you are going to stream your video. Let’s begin with step-by-step procedures to follow for the best streaming settings for your low-end PCs or laptops.
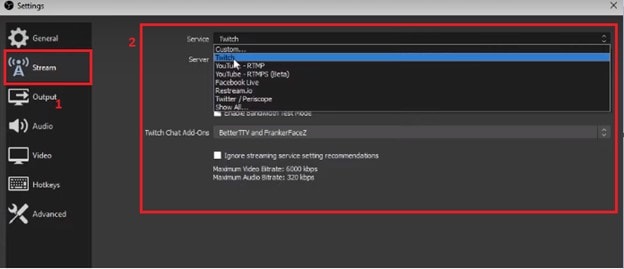
Step 1: Stream Tab
The streaming tab can be accessed from the main vertical tab. After going to the main “stream” tab you will see a bunch of options.
 PDF application, powered by AI-based OCR, for unified workflows with both digital and scanned documents.
 Step 2: Streaming Settings
Service:
Here you have to choose the platform on which you are going to stream your videos. It consists of multiple names of popular streaming servers such as youtube, twitch, Facebook live, etc.
Server:
This option let you choose a server to upload your streaming. It is best to keep it on “auto” because it will select the server with the best pings for quality streaming.
4. Best Alternative to OBS
There is a lot of other screen recording software on the internet that offers many tools to do the streaming. But the only question that comes to mind that which one you should choose from all of them. A lot of you guys will be already using OBS. Of course, it is the best of all other software for streaming videos to the streaming platforms but still, if someone does not wants to OBS for some reason then he should opt for another amazing alternative application known as Filmora.
Parental Control Software
For Win 7 or later (64-bit)
For macOS 10.12 or later
Filmora is one of the best editing applications for modifying your videos in the most creative way possible. A lot of streamers prefer using Filmora for their video content and they are using it for editing. Use Filmora to edit your videos before streaming them to any of the servers. You can keep the encoder settings, a variety of streaming extensions for videos, and put artistic effects on videos before streaming them with Filmora.
There may be a lot of other software which serve the same purpose but the best one is decided by the features and functionality associated with it. It’s not wise to recommend software or the best settings before trying it yourself. Here in this article, a research-based recommendation was suggested by trying each one of the options before coming to a suggestion. However, it is no doubt that low-end PCs and Laptops depend on the settings of the streaming application for the best performance. Therefore, after reading this article I hope it will help you in setting up your machine to stream perfectly.
- Title: [New] Minimalist OBS Adjustments for Under-$500 PCs for 2024
- Author: Catherine
- Created at : 2024-07-19 13:46:10
- Updated at : 2024-07-20 13:46:10
- Link: https://desktop-recording.techidaily.com/new-minimalist-obs-adjustments-for-under-500-pcs-for-2024/
- License: This work is licensed under CC BY-NC-SA 4.0.