![[New] Ultimate Mac Screen Recording Apps Without Bandicam for 2024](https://thmb.techidaily.com/298329c51bf36530c944afd2311460eb93803d5bd2abed16461ddf6c80bb2da9.jpg)
[New] Ultimate Mac Screen Recording Apps Without Bandicam for 2024
Ultimate Mac Screen Recording Apps Without Bandicam
Assuming that you’ve been keeping watch for a method for recording your PC screen on PC, chances are, you’ve run over the famous recorder, Bandicam Mac download. Created by Bandisoft, the Bandicam program is an incredible screen recording application for Windows 10. Tragically, there are no adaptations for Bandicam Mac or Linux. With three recording modes for screen recording, game recording, and gadget recording, there’s no question that Bandicam brings a great deal to the table. Thus, clients have been on a journey for Bandicam mac alternatives. So regardless of whether you are searching for applications like Bandicam for Ubuntu, Mac, or Windows 10, we got you covered.
Bandicam is a notable screen recorder that is broadly utilized by individuals from one side of the planet to the other. It permits you to catch your screen, webcam, sound, or record real-time video without exertion. In any case, contrasted with other comparable screen recording software , it is more costly and not viable with macOS. Right now, the Bandicam Mac form isn’t accessible, which is the reason Mac clients don’t have the choice of partaking in this present device’s highlights. Fortunately, there are different instruments out there that are incredible options in contrast to Bandicam, and they all work on Mac. On this page, you will get familiar with some Bandicam elective projects, which can run completely on Windows, macOS, or both working OS. Simply keep perusing to pick the product like Bandicam that suits your necessities best.
1. Filmora
Bandicam Screen Recorder isn’t accessible for Mac however there are a lot of choices that sudden spikes in demand for macOS with comparative usefulness. Tragically, the free form has both a watermark and a short recording time breaking point of 10 minutes. So, to see it as a less expensive one or you are a Mac client who needs to observe software like Bandicam, you have quite recently come to the ideal locations. Filmora is the top free Bandicam alternative because of its strong screen recording functionalities, proficient instruments to assist you with editing your recordings with so many elements as explanations, callouts, text/headers, impacts for a cursor, and numerous others.
Peruse on to find out about this incredible Bandicam for Mac options. Probably the best component this Filmora recorder as Bandicam alternative product has to offer is the concurrent recording of screen and webcam, which is great on the off chance that you are wanting to involve this program for Twitch streaming or recording instructional exercises to post on YouTube. The astonishing 120fps recording rate is ideally suited for ultrafast web-based games. Let’s find out the steps to perform the recording with Filmora here:
Follow the steps below to begin recording and saving your screen with this Bandicam mac alternative Filmora solution.
Step 1: Download and Install Bandicam Alternative: Filmora
To begin with, using this Apowersoft alternative, visit the official website and from there, you can find both versions, i-e., Windows and Mac versions with the latest version. Download from there and install the software inside your system to get started.
For Win 7 or later (64-bit)
For macOS 10.12 or later
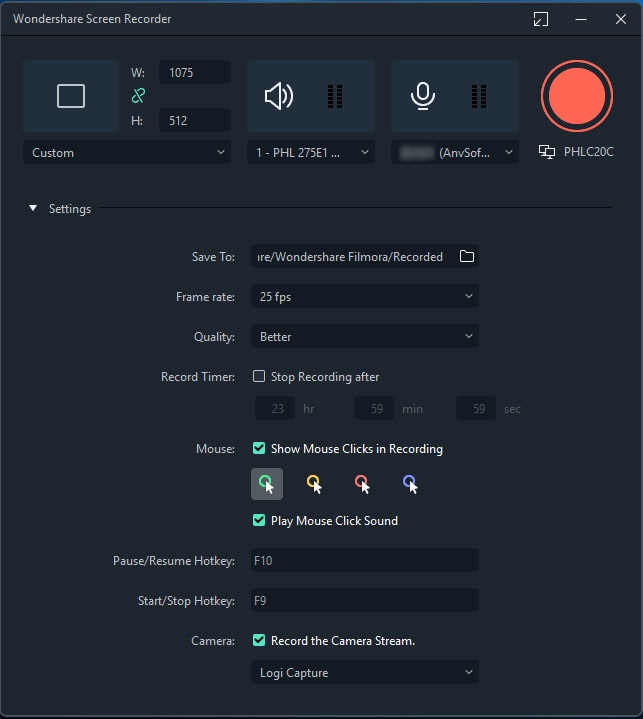
Step 2: Initiate Filmora Recorder
Right after you’re done with the installation process of this Bandicam alternative, launch it from the Start menu and prompt for the New Project. It’ll take you to the user-friendly UI of Filmora where you can pick up the recording feature on-spot. From there, you can customize the screen recording with your desired choices, i-e webcam, microphone, system sound and more as shown in the figure below:

Step 3: Start/Stop Recording
After you’re done with the setup of this Bandicam Mac alternative, hit the Record button and it shall start recording your customized screen right away. And same is the process when you’re done with the recording, hit the Stop button that’ll take you inside the video editor to polish your recorded content.
Step 4: Share Recordings
After you’ve everything summed up, now is the time to export your recording. you have a lot of choices to select while sending out your screen catching and webcam chronicles after you’re finished with the altering part. For that, hit the Export button at the top-right corner of the product interface as follow

Presently to share your work of art straightforwardly to YouTube or some other renowned platform, you can without much of a stretch select your desired platform to share from there.
2. ScreenFlow
ScreenFlow is a Mac selective screen recording, and video altering application. Like most Mac applications, the instrument isn’t for nothing, as you would need to buy the authorized adaptation to utilize its full capacities. This Bandicam for Mac elective assists you with recording excellent video from the work area or Facetime HD camera. Then, at that point, you can keep altering recording with the strong video altering instruments given ScreenFlow. The work process is clear and quick.
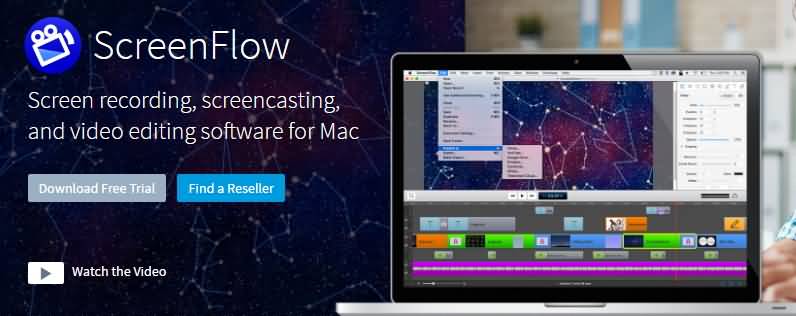
With its strong abilities, clients can add comments in the wake of recording their recordings. It can likewise create yield in various arrangements. The whole inverse of Bandicam Mac is free, which is just accessible on Windows. ScreenFlow is a local Mac application so it likewise works consistently with other Mac applications like iMovie, Final Cut Pro, QuickTime, GarageBand, and so on Assuming you are a macOS client, one of the most outstanding Bandicam options for you is ScreenFlow. To partake in its abilities without limit, you should pay $129. On the off chance that you have never utilized a screen recording program, you will in any case find ScreenFlow exceptionally instinctive and simple to learn.
Step 1: Launch the Program
Dispatch the program and arrange the settings as you want. You can choose “Choices” starting from the drop menu of “Settings” to make progressed settings.
Step 2: Customize the Input
Click the “Sound Input” tab to choose the sound information source you want
Step 3: Start and Save the Recording
Tap “Start/Record” to pick the recording model you like, and afterwards, change the recording region. Click “Alright” to begin recording, while at the same time recording you can make or eradicate comments, click the red stop button to wrap up.
3. Movavi Screen Capture
Movavi Screen Recorder is a magnificent macOS video recorder fit for recording recordings rapidly in a single tick. Due to its strong capacities, you can utilize this recording device to record online classes, WebEx gatherings, and online classes. Different occasions on your screen can likewise be caught with the goal that you can utilize these materials to make recordings unreservedly. With its natural plan, Movavi Screen Capture Studio will cause recording your screen to appear to be basic and direct. You can utilize these catching instruments to record whatever occurs on your PC, regardless of whether it’s an application, game, a Skype call, real-time video, it does include these features.
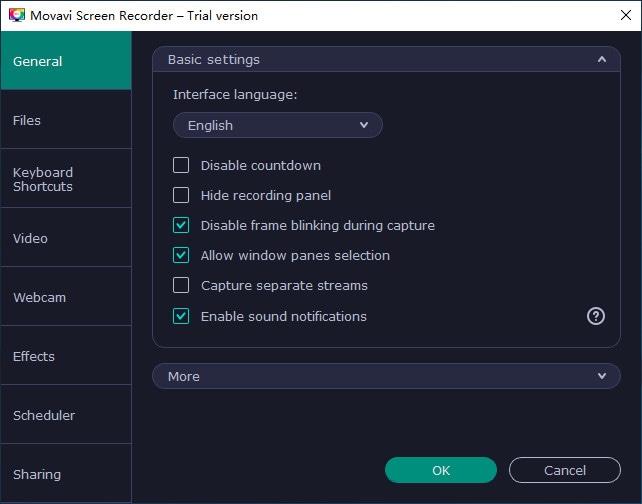
Movavi Screen Recorder Studio has a wide scope of instruments that effectively make it one of the most incredible video catch software bundles accessible today. It’s the ideal screen recording program for both easygoing and expert clients, and it isn’t excessively costly by the same token. With it, you can catch your whole work area or a particular locale, application, or window. It can record transferred video, computer games, VoIP calls, and that’s only the tip of the iceberg. It even records the screens of cell phones, for example, cell phones and tablets. So regardless of whether you want to make a product instructional exercise, a show for work, or a basic YouTube video, Movavi Screen Capture Studio should address every one of your issues. There are PC and Mac renditions, so it deals with the very best home PCs.
To make an instructional exercise including an advanced item or software, what preferable way over to record video film of it directly from your screen? To do that simply dispatch Movavi Screen Capture Studio and select ‘Record screen’ in the dispatch window.
Step 1: Open the Movavi Recorder
Rather than utilizing screen recording, you could catch another film by dispatching Movavi Screen Capture Studio and choosing ‘Alter video’ in the dispatch window. That will open up the proofreader, and you would then be able to tap on the ‘Record Video’ choice to open the catch module.
Step 2: Customize the Recording Mode
In that module, Movavi Screen Capture Studio will permit you to choose a video catch gadget. To be more explicit you could decide to catch the film from a webcam, import it from an AVCHD camera, or even digitize TV tuners or VHS tapes.
Step 3: Start Recording
Whenever you’ve set up the catch settings, you should simply click ‘Start Capture to start recording and afterwards ‘Stop Capture’ when it is finished. If you’re bringing in recordings from an AVCHD camera, you can simply choose them and snap ‘Import’ all things considered.
Step 4: Save the Recording
Since Movavi Screen Capture Studio gives you the necessary resources to record film from an assortment of sources, you ought to have the option to utilize it to make any sort of educational instructional exercise. That is important to assist in utilizing it, as you can make instructional exercises including either physical or computerized items assuming need be.
In the wake of recording the recording that you want, you can move over to Movavi Screen Capture Studio’s supervisor to aggregate it into an instructional exercise. As referenced already you can either get to it after recording a video from your screen by opening it in the supervisor or the dispatch window by choosing the ‘Alter video’ choice.
4. OBS
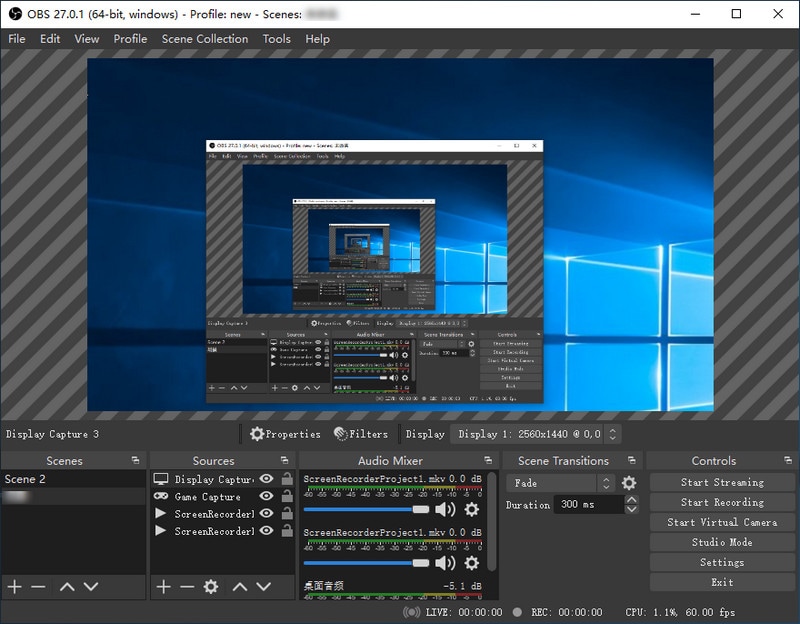
OBS Studio is another screen recorder like Bandicam, and it is an open-source screen recorder that is fundamentally utilized for screen recording and live streaming. This Bandicam comparative software permits you to catch video and sound from various sources, including amplifiers, framework sound, and that’s just the beginning. From sound and video setups, scene manifestations, profound video altering, and then some, no other framework will provide you with the degree of adaptability that OBS studio does.
Furthermore, this product permits you to blend sound and video ongoing with prevalent execution and you will partake in its catch highlight. The product accompanies a bunch of convenient channels that can be utilized with various video sources, these incorporate chroma key and shading key, shading revising modules, concealing, and so on Additionally, after recording, you can add a few changes to the recordings with the natural sound blender. Be that as it may, it is somewhat muddled for amateurs with practically no instructional exercise.
Step 1: Launch OBS Recorder
Introduce OBS and set stream details. In the first place, download OBS and introduce it. At the point when you open OBS interestingly, it will find out if your need is streaming or recording.
Step 2: Select the Recording Source
OBS utilizes an arrangement of Scenes and Sources, these two highlights cooperate to perfectly deal with your video, sound, and other creative resources. At the point when you first dispatch OBS you’ll see there is now a scene included of course, which you can find in the base left corner of the point of interaction. The pace of Frames Per Second (FPS) will rely upon the camera you’re utilizing and what highlights it has. More FPS will give you a keener picture; less will be milder.
Step 3: Begin and Done Recording
At the point when you’re prepared to begin recording click the Start Recording button at the base right. At the point when you’re done snap Stop Recording and a video will be kept in touch with the organizer indicated in your settings.
5. QuickTime
QuickTime is the pre-introduced media player on Mac. Indeed, you can get broad valuable functionalities including a screen recorder. That makes it a basic substitution for Bandicam on Mac. QuickTime Player is, truth be told, a multi-reason apparatus that has various highlights. It helps clients in various circumstances, such as expecting to record screen exercises. Besides having the option to play media documents and recording screens, QuickTime Player can likewise reflect your iOS gadget. It can likewise do it to your Mac gadget, just as record sound documents.

QuickTime Player could assist you with recording your Mac screen without introducing anything. Simply go to the Applications envelope and dispatch it. Notwithstanding, there are not many recording highlights you can involve like those in the above Bandicam for Mac options. QuickTime Player is the staple media player of each Mac gadget. Nonetheless, most clients don’t be familiar with its secret screen recording capacity, which is an extraordinary option in contrast to Bandicam. QuickTime Player is an adaptable apparatus that doesn’t have to introduce on your Mac gadget. This application makes it an extraordinary option in contrast to Mac Bandicam since it isn’t accessible on Mac.
Step 1: Launch QuickTime
When you open QuickTime, pick File > New Screen Recording. This will open a little box with a red button. To begin recording, click the red dab. You will be incited to choose either all or part of your screen.
Step 2: Start Recording
To record the entire screen, simply click anyplace and the recording will begin. To record a piece of the screen, similar to a particular window, snap and drag your mouse to make a square shape over the ideal region.
Step 3: Save Recording
When you begin recording, you will see a little stop symbol in the menu bar on your Mac. If you click it, the recording can stop and you will survey your screen catch. Whenever you’ve quit recording, you will see a video player with your screen catch. You can save it by going to File > Save. QuickTime just saves records as MOV (a configuration local to Apple), however, you can utilize a change program assuming that you would incline toward an MP4 or another arrangement.
Conclusion
Since Bandicam doesn’t have a Mac adaptation, you need to find a Bandicam for Mac elective What ought to be the main elements when you look for an elective program? Is there a Bandicam for Mac choice to record your interactivity, webcam, or another gadget? What ought to be critical to picking an elective program and how to utilize it? Simply learn more insights concerning the best Bandicam for your Mac elective from the article now. Simply learn more insights regarding the reason why you ought to pick Filmora Screen Recorder for Mac as the Bandicam for Mac option and how to utilize the program from the article.
For macOS 10.12 or later
Step 2: Initiate Filmora Recorder
Right after you’re done with the installation process of this Bandicam alternative, launch it from the Start menu and prompt for the New Project. It’ll take you to the user-friendly UI of Filmora where you can pick up the recording feature on-spot. From there, you can customize the screen recording with your desired choices, i-e webcam, microphone, system sound and more as shown in the figure below:
Step 3: Start/Stop Recording
After you’re done with the setup of this Bandicam Mac alternative, hit the Record button and it shall start recording your customized screen right away. And same is the process when you’re done with the recording, hit the Stop button that’ll take you inside the video editor to polish your recorded content.

Step 4: Share Recordings
After you’ve everything summed up, now is the time to export your recording. you have a lot of choices to select while sending out your screen catching and webcam chronicles after you’re finished with the altering part. For that, hit the Export button at the top-right corner of the product interface as follow
Presently to share your work of art straightforwardly to YouTube or some other renowned platform, you can without much of a stretch select your desired platform to share from there.
2. ScreenFlow
ScreenFlow is a Mac selective screen recording, and video altering application. Like most Mac applications, the instrument isn’t for nothing, as you would need to buy the authorized adaptation to utilize its full capacities. This Bandicam for Mac elective assists you with recording excellent video from the work area or Facetime HD camera. Then, at that point, you can keep altering recording with the strong video altering instruments given ScreenFlow. The work process is clear and quick.
With its strong abilities, clients can add comments in the wake of recording their recordings. It can likewise create yield in various arrangements. The whole inverse of Bandicam Mac is free, which is just accessible on Windows. ScreenFlow is a local Mac application so it likewise works consistently with other Mac applications like iMovie, Final Cut Pro, QuickTime, GarageBand, and so on Assuming you are a macOS client, one of the most outstanding Bandicam options for you is ScreenFlow. To partake in its abilities without limit, you should pay $129. On the off chance that you have never utilized a screen recording program, you will in any case find ScreenFlow exceptionally instinctive and simple to learn.
Step 1: Launch the Program
Dispatch the program and arrange the settings as you want. You can choose “Choices” starting from the drop menu of “Settings” to make progressed settings.
Step 2: Customize the Input
Click the “Sound Input” tab to choose the sound information source you want
Step 3: Start and Save the Recording
Tap “Start/Record” to pick the recording model you like, and afterwards, change the recording region. Click “Alright” to begin recording, while at the same time recording you can make or eradicate comments, click the red stop button to wrap up.
3. Movavi Screen Capture
Movavi Screen Recorder is a magnificent macOS video recorder fit for recording recordings rapidly in a single tick. Due to its strong capacities, you can utilize this recording device to record online classes, WebEx gatherings, and online classes. Different occasions on your screen can likewise be caught with the goal that you can utilize these materials to make recordings unreservedly. With its natural plan, Movavi Screen Capture Studio will cause recording your screen to appear to be basic and direct. You can utilize these catching instruments to record whatever occurs on your PC, regardless of whether it’s an application, game, a Skype call, real-time video, it does include these features.
Movavi Screen Recorder Studio has a wide scope of instruments that effectively make it one of the most incredible video catch software bundles accessible today. It’s the ideal screen recording program for both easygoing and expert clients, and it isn’t excessively costly by the same token. With it, you can catch your whole work area or a particular locale, application, or window. It can record transferred video, computer games, VoIP calls, and that’s only the tip of the iceberg. It even records the screens of cell phones, for example, cell phones and tablets. So regardless of whether you want to make a product instructional exercise, a show for work, or a basic YouTube video, Movavi Screen Capture Studio should address every one of your issues. There are PC and Mac renditions, so it deals with the very best home PCs.
To make an instructional exercise including an advanced item or software, what preferable way over to record video film of it directly from your screen? To do that simply dispatch Movavi Screen Capture Studio and select ‘Record screen’ in the dispatch window.
Step 1: Open the Movavi Recorder
Rather than utilizing screen recording, you could catch another film by dispatching Movavi Screen Capture Studio and choosing ‘Alter video’ in the dispatch window. That will open up the proofreader, and you would then be able to tap on the ‘Record Video’ choice to open the catch module.
Step 2: Customize the Recording Mode
In that module, Movavi Screen Capture Studio will permit you to choose a video catch gadget. To be more explicit you could decide to catch the film from a webcam, import it from an AVCHD camera, or even digitize TV tuners or VHS tapes.
Step 3: Start Recording
Whenever you’ve set up the catch settings, you should simply click ‘Start Capture to start recording and afterwards ‘Stop Capture’ when it is finished. If you’re bringing in recordings from an AVCHD camera, you can simply choose them and snap ‘Import’ all things considered.
Step 4: Save the Recording
Since Movavi Screen Capture Studio gives you the necessary resources to record film from an assortment of sources, you ought to have the option to utilize it to make any sort of educational instructional exercise. That is important to assist in utilizing it, as you can make instructional exercises including either physical or computerized items assuming need be.
In the wake of recording the recording that you want, you can move over to Movavi Screen Capture Studio’s supervisor to aggregate it into an instructional exercise. As referenced already you can either get to it after recording a video from your screen by opening it in the supervisor or the dispatch window by choosing the ‘Alter video’ choice.

4. OBS
OBS Studio is another screen recorder like Bandicam, and it is an open-source screen recorder that is fundamentally utilized for screen recording and live streaming. This Bandicam comparative software permits you to catch video and sound from various sources, including amplifiers, framework sound, and that’s just the beginning. From sound and video setups, scene manifestations, profound video altering, and then some, no other framework will provide you with the degree of adaptability that OBS studio does.

Furthermore, this product permits you to blend sound and video ongoing with prevalent execution and you will partake in its catch highlight. The product accompanies a bunch of convenient channels that can be utilized with various video sources, these incorporate chroma key and shading key, shading revising modules, concealing, and so on Additionally, after recording, you can add a few changes to the recordings with the natural sound blender. Be that as it may, it is somewhat muddled for amateurs with practically no instructional exercise.
Step 1: Launch OBS Recorder
Introduce OBS and set stream details. In the first place, download OBS and introduce it. At the point when you open OBS interestingly, it will find out if your need is streaming or recording.
Step 2: Select the Recording Source
OBS utilizes an arrangement of Scenes and Sources, these two highlights cooperate to perfectly deal with your video, sound, and other creative resources. At the point when you first dispatch OBS you’ll see there is now a scene included of course, which you can find in the base left corner of the point of interaction. The pace of Frames Per Second (FPS) will rely upon the camera you’re utilizing and what highlights it has. More FPS will give you a keener picture; less will be milder.
Step 3: Begin and Done Recording
At the point when you’re prepared to begin recording click the Start Recording button at the base right. At the point when you’re done snap Stop Recording and a video will be kept in touch with the organizer indicated in your settings.

5. QuickTime
QuickTime is the pre-introduced media player on Mac. Indeed, you can get broad valuable functionalities including a screen recorder. That makes it a basic substitution for Bandicam on Mac. QuickTime Player is, truth be told, a multi-reason apparatus that has various highlights. It helps clients in various circumstances, such as expecting to record screen exercises. Besides having the option to play media documents and recording screens, QuickTime Player can likewise reflect your iOS gadget. It can likewise do it to your Mac gadget, just as record sound documents.

QuickTime Player could assist you with recording your Mac screen without introducing anything. Simply go to the Applications envelope and dispatch it. Notwithstanding, there are not many recording highlights you can involve like those in the above Bandicam for Mac options. QuickTime Player is the staple media player of each Mac gadget. Nonetheless, most clients don’t be familiar with its secret screen recording capacity, which is an extraordinary option in contrast to Bandicam. QuickTime Player is an adaptable apparatus that doesn’t have to introduce on your Mac gadget. This application makes it an extraordinary option in contrast to Mac Bandicam since it isn’t accessible on Mac.
Step 1: Launch QuickTime
When you open QuickTime, pick File > New Screen Recording. This will open a little box with a red button. To begin recording, click the red dab. You will be incited to choose either all or part of your screen.
Step 2: Start Recording
To record the entire screen, simply click anyplace and the recording will begin. To record a piece of the screen, similar to a particular window, snap and drag your mouse to make a square shape over the ideal region.
Step 3: Save Recording
When you begin recording, you will see a little stop symbol in the menu bar on your Mac. If you click it, the recording can stop and you will survey your screen catch. Whenever you’ve quit recording, you will see a video player with your screen catch. You can save it by going to File > Save. QuickTime just saves records as MOV (a configuration local to Apple), however, you can utilize a change program assuming that you would incline toward an MP4 or another arrangement.
Conclusion
Since Bandicam doesn’t have a Mac adaptation, you need to find a Bandicam for Mac elective What ought to be the main elements when you look for an elective program? Is there a Bandicam for Mac choice to record your interactivity, webcam, or another gadget? What ought to be critical to picking an elective program and how to utilize it? Simply learn more insights concerning the best Bandicam for your Mac elective from the article now. Simply learn more insights regarding the reason why you ought to pick Filmora Screen Recorder for Mac as the Bandicam for Mac option and how to utilize the program from the article.
For macOS 10.12 or later
Step 2: Initiate Filmora Recorder
Right after you’re done with the installation process of this Bandicam alternative, launch it from the Start menu and prompt for the New Project. It’ll take you to the user-friendly UI of Filmora where you can pick up the recording feature on-spot. From there, you can customize the screen recording with your desired choices, i-e webcam, microphone, system sound and more as shown in the figure below:
Step 3: Start/Stop Recording
After you’re done with the setup of this Bandicam Mac alternative, hit the Record button and it shall start recording your customized screen right away. And same is the process when you’re done with the recording, hit the Stop button that’ll take you inside the video editor to polish your recorded content.
Step 4: Share Recordings
After you’ve everything summed up, now is the time to export your recording. you have a lot of choices to select while sending out your screen catching and webcam chronicles after you’re finished with the altering part. For that, hit the Export button at the top-right corner of the product interface as follow
Presently to share your work of art straightforwardly to YouTube or some other renowned platform, you can without much of a stretch select your desired platform to share from there.
2. ScreenFlow
ScreenFlow is a Mac selective screen recording, and video altering application. Like most Mac applications, the instrument isn’t for nothing, as you would need to buy the authorized adaptation to utilize its full capacities. This Bandicam for Mac elective assists you with recording excellent video from the work area or Facetime HD camera. Then, at that point, you can keep altering recording with the strong video altering instruments given ScreenFlow. The work process is clear and quick.
With its strong abilities, clients can add comments in the wake of recording their recordings. It can likewise create yield in various arrangements. The whole inverse of Bandicam Mac is free, which is just accessible on Windows. ScreenFlow is a local Mac application so it likewise works consistently with other Mac applications like iMovie, Final Cut Pro, QuickTime, GarageBand, and so on Assuming you are a macOS client, one of the most outstanding Bandicam options for you is ScreenFlow. To partake in its abilities without limit, you should pay $129. On the off chance that you have never utilized a screen recording program, you will in any case find ScreenFlow exceptionally instinctive and simple to learn.
Step 1: Launch the Program
Dispatch the program and arrange the settings as you want. You can choose “Choices” starting from the drop menu of “Settings” to make progressed settings.
Step 2: Customize the Input
Click the “Sound Input” tab to choose the sound information source you want
Step 3: Start and Save the Recording
Tap “Start/Record” to pick the recording model you like, and afterwards, change the recording region. Click “Alright” to begin recording, while at the same time recording you can make or eradicate comments, click the red stop button to wrap up.
 Jet Profiler for MySQL, Enterprise Version: Jet Profiler for MySQL is real-time query performance and diagnostics tool for the MySQL database server. Its detailed query information, graphical interface and ease of use makes this a great tool for finding performance bottlenecks in your MySQL databases.
 3. Movavi Screen Capture
Movavi Screen Recorder is a magnificent macOS video recorder fit for recording recordings rapidly in a single tick. Due to its strong capacities, you can utilize this recording device to record online classes, WebEx gatherings, and online classes. Different occasions on your screen can likewise be caught with the goal that you can utilize these materials to make recordings unreservedly. With its natural plan, Movavi Screen Capture Studio will cause recording your screen to appear to be basic and direct. You can utilize these catching instruments to record whatever occurs on your PC, regardless of whether it’s an application, game, a Skype call, real-time video, it does include these features.
Movavi Screen Recorder Studio has a wide scope of instruments that effectively make it one of the most incredible video catch software bundles accessible today. It’s the ideal screen recording program for both easygoing and expert clients, and it isn’t excessively costly by the same token. With it, you can catch your whole work area or a particular locale, application, or window. It can record transferred video, computer games, VoIP calls, and that’s only the tip of the iceberg. It even records the screens of cell phones, for example, cell phones and tablets. So regardless of whether you want to make a product instructional exercise, a show for work, or a basic YouTube video, Movavi Screen Capture Studio should address every one of your issues. There are PC and Mac renditions, so it deals with the very best home PCs.
To make an instructional exercise including an advanced item or software, what preferable way over to record video film of it directly from your screen? To do that simply dispatch Movavi Screen Capture Studio and select ‘Record screen’ in the dispatch window.
Step 1: Open the Movavi Recorder
Rather than utilizing screen recording, you could catch another film by dispatching Movavi Screen Capture Studio and choosing ‘Alter video’ in the dispatch window. That will open up the proofreader, and you would then be able to tap on the ‘Record Video’ choice to open the catch module.
Step 2: Customize the Recording Mode
In that module, Movavi Screen Capture Studio will permit you to choose a video catch gadget. To be more explicit you could decide to catch the film from a webcam, import it from an AVCHD camera, or even digitize TV tuners or VHS tapes.
Step 3: Start Recording
Whenever you’ve set up the catch settings, you should simply click ‘Start Capture to start recording and afterwards ‘Stop Capture’ when it is finished. If you’re bringing in recordings from an AVCHD camera, you can simply choose them and snap ‘Import’ all things considered.
Step 4: Save the Recording
Since Movavi Screen Capture Studio gives you the necessary resources to record film from an assortment of sources, you ought to have the option to utilize it to make any sort of educational instructional exercise. That is important to assist in utilizing it, as you can make instructional exercises including either physical or computerized items assuming need be.
In the wake of recording the recording that you want, you can move over to Movavi Screen Capture Studio’s supervisor to aggregate it into an instructional exercise. As referenced already you can either get to it after recording a video from your screen by opening it in the supervisor or the dispatch window by choosing the ‘Alter video’ choice.
4. OBS
OBS Studio is another screen recorder like Bandicam, and it is an open-source screen recorder that is fundamentally utilized for screen recording and live streaming. This Bandicam comparative software permits you to catch video and sound from various sources, including amplifiers, framework sound, and that’s just the beginning. From sound and video setups, scene manifestations, profound video altering, and then some, no other framework will provide you with the degree of adaptability that OBS studio does.
Furthermore, this product permits you to blend sound and video ongoing with prevalent execution and you will partake in its catch highlight. The product accompanies a bunch of convenient channels that can be utilized with various video sources, these incorporate chroma key and shading key, shading revising modules, concealing, and so on Additionally, after recording, you can add a few changes to the recordings with the natural sound blender. Be that as it may, it is somewhat muddled for amateurs with practically no instructional exercise.
Step 1: Launch OBS Recorder
Introduce OBS and set stream details. In the first place, download OBS and introduce it. At the point when you open OBS interestingly, it will find out if your need is streaming or recording.
Step 2: Select the Recording Source
OBS utilizes an arrangement of Scenes and Sources, these two highlights cooperate to perfectly deal with your video, sound, and other creative resources. At the point when you first dispatch OBS you’ll see there is now a scene included of course, which you can find in the base left corner of the point of interaction. The pace of Frames Per Second (FPS) will rely upon the camera you’re utilizing and what highlights it has. More FPS will give you a keener picture; less will be milder.
Step 3: Begin and Done Recording
At the point when you’re prepared to begin recording click the Start Recording button at the base right. At the point when you’re done snap Stop Recording and a video will be kept in touch with the organizer indicated in your settings.
 Forex Robotron Gold Package
5. QuickTime
QuickTime is the pre-introduced media player on Mac. Indeed, you can get broad valuable functionalities including a screen recorder. That makes it a basic substitution for Bandicam on Mac. QuickTime Player is, truth be told, a multi-reason apparatus that has various highlights. It helps clients in various circumstances, such as expecting to record screen exercises. Besides having the option to play media documents and recording screens, QuickTime Player can likewise reflect your iOS gadget. It can likewise do it to your Mac gadget, just as record sound documents.
QuickTime Player could assist you with recording your Mac screen without introducing anything. Simply go to the Applications envelope and dispatch it. Notwithstanding, there are not many recording highlights you can involve like those in the above Bandicam for Mac options. QuickTime Player is the staple media player of each Mac gadget. Nonetheless, most clients don’t be familiar with its secret screen recording capacity, which is an extraordinary option in contrast to Bandicam. QuickTime Player is an adaptable apparatus that doesn’t have to introduce on your Mac gadget. This application makes it an extraordinary option in contrast to Mac Bandicam since it isn’t accessible on Mac.
Step 1: Launch QuickTime
When you open QuickTime, pick File > New Screen Recording. This will open a little box with a red button. To begin recording, click the red dab. You will be incited to choose either all or part of your screen.
Step 2: Start Recording
To record the entire screen, simply click anyplace and the recording will begin. To record a piece of the screen, similar to a particular window, snap and drag your mouse to make a square shape over the ideal region.
Step 3: Save Recording
When you begin recording, you will see a little stop symbol in the menu bar on your Mac. If you click it, the recording can stop and you will survey your screen catch. Whenever you’ve quit recording, you will see a video player with your screen catch. You can save it by going to File > Save. QuickTime just saves records as MOV (a configuration local to Apple), however, you can utilize a change program assuming that you would incline toward an MP4 or another arrangement.

Conclusion
Since Bandicam doesn’t have a Mac adaptation, you need to find a Bandicam for Mac elective What ought to be the main elements when you look for an elective program? Is there a Bandicam for Mac choice to record your interactivity, webcam, or another gadget? What ought to be critical to picking an elective program and how to utilize it? Simply learn more insights concerning the best Bandicam for your Mac elective from the article now. Simply learn more insights regarding the reason why you ought to pick Filmora Screen Recorder for Mac as the Bandicam for Mac option and how to utilize the program from the article.
For macOS 10.12 or later
Step 2: Initiate Filmora Recorder
Right after you’re done with the installation process of this Bandicam alternative, launch it from the Start menu and prompt for the New Project. It’ll take you to the user-friendly UI of Filmora where you can pick up the recording feature on-spot. From there, you can customize the screen recording with your desired choices, i-e webcam, microphone, system sound and more as shown in the figure below:
Step 3: Start/Stop Recording
After you’re done with the setup of this Bandicam Mac alternative, hit the Record button and it shall start recording your customized screen right away. And same is the process when you’re done with the recording, hit the Stop button that’ll take you inside the video editor to polish your recorded content.
Step 4: Share Recordings
After you’ve everything summed up, now is the time to export your recording. you have a lot of choices to select while sending out your screen catching and webcam chronicles after you’re finished with the altering part. For that, hit the Export button at the top-right corner of the product interface as follow
Presently to share your work of art straightforwardly to YouTube or some other renowned platform, you can without much of a stretch select your desired platform to share from there.
2. ScreenFlow
ScreenFlow is a Mac selective screen recording, and video altering application. Like most Mac applications, the instrument isn’t for nothing, as you would need to buy the authorized adaptation to utilize its full capacities. This Bandicam for Mac elective assists you with recording excellent video from the work area or Facetime HD camera. Then, at that point, you can keep altering recording with the strong video altering instruments given ScreenFlow. The work process is clear and quick.
With its strong abilities, clients can add comments in the wake of recording their recordings. It can likewise create yield in various arrangements. The whole inverse of Bandicam Mac is free, which is just accessible on Windows. ScreenFlow is a local Mac application so it likewise works consistently with other Mac applications like iMovie, Final Cut Pro, QuickTime, GarageBand, and so on Assuming you are a macOS client, one of the most outstanding Bandicam options for you is ScreenFlow. To partake in its abilities without limit, you should pay $129. On the off chance that you have never utilized a screen recording program, you will in any case find ScreenFlow exceptionally instinctive and simple to learn.
Step 1: Launch the Program
Dispatch the program and arrange the settings as you want. You can choose “Choices” starting from the drop menu of “Settings” to make progressed settings.
Step 2: Customize the Input
Click the “Sound Input” tab to choose the sound information source you want
Step 3: Start and Save the Recording
Tap “Start/Record” to pick the recording model you like, and afterwards, change the recording region. Click “Alright” to begin recording, while at the same time recording you can make or eradicate comments, click the red stop button to wrap up.
3. Movavi Screen Capture
Movavi Screen Recorder is a magnificent macOS video recorder fit for recording recordings rapidly in a single tick. Due to its strong capacities, you can utilize this recording device to record online classes, WebEx gatherings, and online classes. Different occasions on your screen can likewise be caught with the goal that you can utilize these materials to make recordings unreservedly. With its natural plan, Movavi Screen Capture Studio will cause recording your screen to appear to be basic and direct. You can utilize these catching instruments to record whatever occurs on your PC, regardless of whether it’s an application, game, a Skype call, real-time video, it does include these features.
Movavi Screen Recorder Studio has a wide scope of instruments that effectively make it one of the most incredible video catch software bundles accessible today. It’s the ideal screen recording program for both easygoing and expert clients, and it isn’t excessively costly by the same token. With it, you can catch your whole work area or a particular locale, application, or window. It can record transferred video, computer games, VoIP calls, and that’s only the tip of the iceberg. It even records the screens of cell phones, for example, cell phones and tablets. So regardless of whether you want to make a product instructional exercise, a show for work, or a basic YouTube video, Movavi Screen Capture Studio should address every one of your issues. There are PC and Mac renditions, so it deals with the very best home PCs.
To make an instructional exercise including an advanced item or software, what preferable way over to record video film of it directly from your screen? To do that simply dispatch Movavi Screen Capture Studio and select ‘Record screen’ in the dispatch window.
Step 1: Open the Movavi Recorder
Rather than utilizing screen recording, you could catch another film by dispatching Movavi Screen Capture Studio and choosing ‘Alter video’ in the dispatch window. That will open up the proofreader, and you would then be able to tap on the ‘Record Video’ choice to open the catch module.
Step 2: Customize the Recording Mode
In that module, Movavi Screen Capture Studio will permit you to choose a video catch gadget. To be more explicit you could decide to catch the film from a webcam, import it from an AVCHD camera, or even digitize TV tuners or VHS tapes.
Step 3: Start Recording
Whenever you’ve set up the catch settings, you should simply click ‘Start Capture to start recording and afterwards ‘Stop Capture’ when it is finished. If you’re bringing in recordings from an AVCHD camera, you can simply choose them and snap ‘Import’ all things considered.
Step 4: Save the Recording
Since Movavi Screen Capture Studio gives you the necessary resources to record film from an assortment of sources, you ought to have the option to utilize it to make any sort of educational instructional exercise. That is important to assist in utilizing it, as you can make instructional exercises including either physical or computerized items assuming need be.
In the wake of recording the recording that you want, you can move over to Movavi Screen Capture Studio’s supervisor to aggregate it into an instructional exercise. As referenced already you can either get to it after recording a video from your screen by opening it in the supervisor or the dispatch window by choosing the ‘Alter video’ choice.

4. OBS
OBS Studio is another screen recorder like Bandicam, and it is an open-source screen recorder that is fundamentally utilized for screen recording and live streaming. This Bandicam comparative software permits you to catch video and sound from various sources, including amplifiers, framework sound, and that’s just the beginning. From sound and video setups, scene manifestations, profound video altering, and then some, no other framework will provide you with the degree of adaptability that OBS studio does.
Furthermore, this product permits you to blend sound and video ongoing with prevalent execution and you will partake in its catch highlight. The product accompanies a bunch of convenient channels that can be utilized with various video sources, these incorporate chroma key and shading key, shading revising modules, concealing, and so on Additionally, after recording, you can add a few changes to the recordings with the natural sound blender. Be that as it may, it is somewhat muddled for amateurs with practically no instructional exercise.
Step 1: Launch OBS Recorder
Introduce OBS and set stream details. In the first place, download OBS and introduce it. At the point when you open OBS interestingly, it will find out if your need is streaming or recording.
Step 2: Select the Recording Source
OBS utilizes an arrangement of Scenes and Sources, these two highlights cooperate to perfectly deal with your video, sound, and other creative resources. At the point when you first dispatch OBS you’ll see there is now a scene included of course, which you can find in the base left corner of the point of interaction. The pace of Frames Per Second (FPS) will rely upon the camera you’re utilizing and what highlights it has. More FPS will give you a keener picture; less will be milder.
Step 3: Begin and Done Recording
At the point when you’re prepared to begin recording click the Start Recording button at the base right. At the point when you’re done snap Stop Recording and a video will be kept in touch with the organizer indicated in your settings.

5. QuickTime
QuickTime is the pre-introduced media player on Mac. Indeed, you can get broad valuable functionalities including a screen recorder. That makes it a basic substitution for Bandicam on Mac. QuickTime Player is, truth be told, a multi-reason apparatus that has various highlights. It helps clients in various circumstances, such as expecting to record screen exercises. Besides having the option to play media documents and recording screens, QuickTime Player can likewise reflect your iOS gadget. It can likewise do it to your Mac gadget, just as record sound documents.
QuickTime Player could assist you with recording your Mac screen without introducing anything. Simply go to the Applications envelope and dispatch it. Notwithstanding, there are not many recording highlights you can involve like those in the above Bandicam for Mac options. QuickTime Player is the staple media player of each Mac gadget. Nonetheless, most clients don’t be familiar with its secret screen recording capacity, which is an extraordinary option in contrast to Bandicam. QuickTime Player is an adaptable apparatus that doesn’t have to introduce on your Mac gadget. This application makes it an extraordinary option in contrast to Mac Bandicam since it isn’t accessible on Mac.
Step 1: Launch QuickTime
When you open QuickTime, pick File > New Screen Recording. This will open a little box with a red button. To begin recording, click the red dab. You will be incited to choose either all or part of your screen.
Step 2: Start Recording
To record the entire screen, simply click anyplace and the recording will begin. To record a piece of the screen, similar to a particular window, snap and drag your mouse to make a square shape over the ideal region.
Step 3: Save Recording
When you begin recording, you will see a little stop symbol in the menu bar on your Mac. If you click it, the recording can stop and you will survey your screen catch. Whenever you’ve quit recording, you will see a video player with your screen catch. You can save it by going to File > Save. QuickTime just saves records as MOV (a configuration local to Apple), however, you can utilize a change program assuming that you would incline toward an MP4 or another arrangement.
Conclusion
Since Bandicam doesn’t have a Mac adaptation, you need to find a Bandicam for Mac elective What ought to be the main elements when you look for an elective program? Is there a Bandicam for Mac choice to record your interactivity, webcam, or another gadget? What ought to be critical to picking an elective program and how to utilize it? Simply learn more insights concerning the best Bandicam for your Mac elective from the article now. Simply learn more insights regarding the reason why you ought to pick Filmora Screen Recorder for Mac as the Bandicam for Mac option and how to utilize the program from the article.
- Title: [New] Ultimate Mac Screen Recording Apps Without Bandicam for 2024
- Author: Catherine
- Created at : 2024-07-19 12:58:10
- Updated at : 2024-07-20 12:58:10
- Link: https://desktop-recording.techidaily.com/new-ultimate-mac-screen-recording-apps-without-bandicam-for-2024/
- License: This work is licensed under CC BY-NC-SA 4.0.