
Universal Techniques for Streaming to Disk From YouTube
Universal Techniques for Streaming to Disk From YouTube
Live streaming video on YouTube is extremely popular among YouTubers. Live stream videos have a different feel as the video creators can interact with their audiences in real-time. YouTubers use live streaming feature to stream any live event, take live classes, organize live webinars, and much more. If you want to view the live streaming session of your favorite YouTuber at any future instance, you need to record YouTube live stream.
In fact, if you are a YouTuber yourself and you are live streaming, you need a YouTube live stream recorder so that you can record your live stream and upload the video on YouTube. YouTube does come with an option to archive your live streams but it is not reliable. Hence, almost all YouTubers opt for an external live stream screen recorder to record their live sessions. Here is the list of the best YouTube live stream screen recorder apps.
Note: We resolutely oppose all forms of copyright-infringing downloads. This tutorial is only for downloading YouTube videos/audio materials from your own channel.
Part 1. Record YouTube Stream with on PC/Mac with Filmora
The best YouTube live stream screen recorder is Wondershare Filmora. It is a premium screen recorder as well as a professional video editor. You can record your screen activities such as your gameplay that you are live streaming. Along with that, you can record your webcam video that you are live streaming alongside your screen video. You can also record someone’s YouTube live stream session by playing the video full screen on your computer. Filmora is available for both Windows and Mac users. Here are the steps to record YouTube live stream with Filmora.
For Win 7 or later (64-bit)
For macOS 10.12 or later
Step 1: Download and install Wondershare Filmora. Launch Filmora and click on New Project.

Step 2: Click on Record and select Record From Webcam if your YouTube live stream will be you speaking to your audience. Otherwise, you can select Record PC Screen if you are live streaming gameplay or screen activities. Here, we are considering Record PC Screen option which you can use to record someone’s YouTube live stream session as well.

Step 3: Choose the recording screen area and select the system audio and external mic audio sources properly. Turn on “Record Camera Stream” option if you want to capture your webcam along with the screen in PiP mode.

Step 4: Click on Record button to start recording as soon as you go live on YouTube. Press F9 key to stop recording when you end your live stream on YouTube. You can edit and export in the desired file format.

Part 2. Use QuickTime to Record YouTube Stream on Mac
If you are a Mac user, QuickTime Player comes pre-installed and it is the default media player. You can use QuickTime to record your screen activities when you go live on YouTube. You can also record someone’s live stream as well by playing it on your screen and recording the screen in the background with QuickTime. QuickTime is completely free and readily available for Mac users. There is no need for installing any third-party app. Here are the steps to record YouTube live stream with QuickTime.
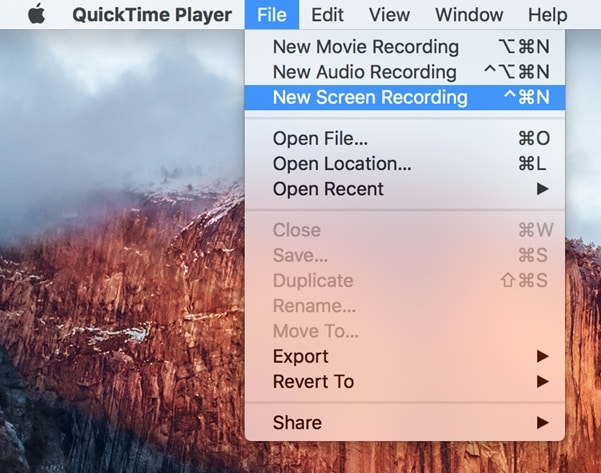
Step 1: Open QuickTime Player from Applications folder. Go to File and then to New Screen Recording option.
Step 2: When YouTube live streaming session begins, click on the Record button from QuickTime floating widget.

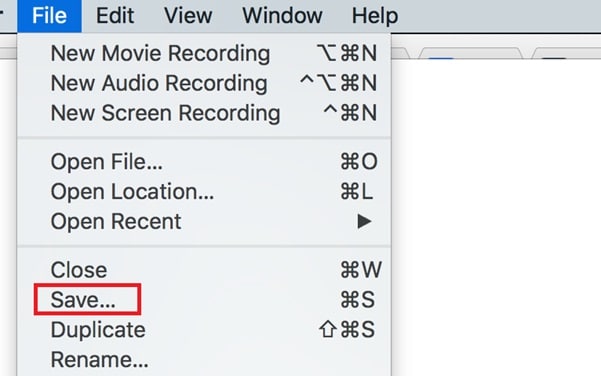
Step 3: When the session gets over, click on Stop button. Go to File> Save option to save the recorded video on your hard drive.
Part 3. Use OBS Studio Stream Recorder
If you are a YouTuber yourself, you must have been using OBS Studio for YouTube live streaming. OBS Studio is the most popular platform for live streaming video on almost all online platforms where live streaming option is available. OBS Studio also lets you record your YouTube live streaming session as well as record others’ YouTube live sessions. OBS Studio is completely free to use and it is available for all desktop operating systems. Here are the steps to record YouTube live stream Windows 10 and Mac with OBS.
Step 1: Download and install OBS Studio as per your operating system. Launch the software after installation.
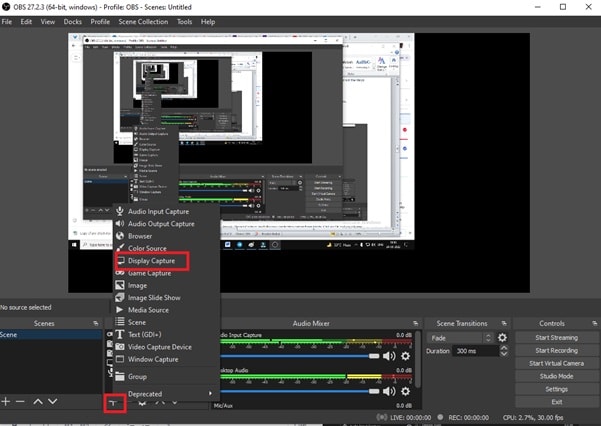
Step 2: Under Sources tab and click on “+” icon. Select Display Capture if you want to record your screen when you want to record someone’s live stream or your live stream where you are showing screen activities.
Step 3: You have to enter a name for the YouTube live stream capturing session and click on Ok button.

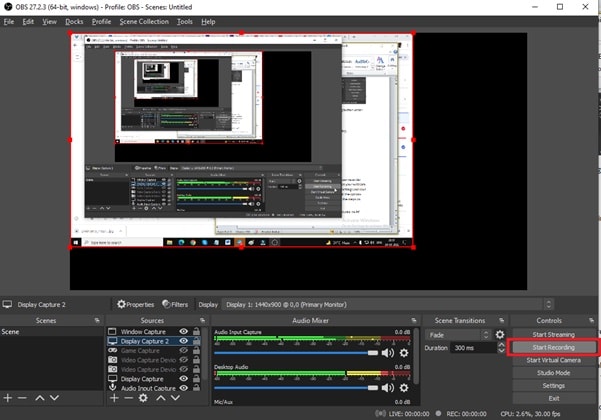
Step 4: You will see your screen video on the OBS window for confirmation that the connection is well established. Click on Start Recording button under Controls tab when you start your live streaming session on YouTube. OBS will keep recording your screen activities in the background.
Step 5: To stop recording, go to OBS Studio and click on Stop Recording. You can use the available Hotkeys to start and stop recording.
Part 4. Use AZ Screen Recorder on Android
If you have the latest version of Android, you might have an inbuilt screen recorder. But different Android smartphone comes with different Android version and the screen recorder may not be present. Hence, it is better to opt for YouTube live stream screen recorder app from Play Store. We recommend AZ Screen Recorder for recording your screen when you play YouTube live streaming video. Here are the steps to follow.
Step 1: Go to Google Play Store and install AZ Screen Recorder.
Step 2: Launch AZ Screen Recorder and allow the necessary permissions. It comes in the form of a widget with floating buttons on the side of the screen. Tap on the gear icon for video settings.
Step 3: Open YouTube live streaming video and tap on the Red Record button on AZ Screen Recorder widget to start recording.

Step 4: To stop the recording once the live stream is over, you have to tap on AZ screen recorder widget icon. Tap on Stop icon and the recorded video will be available in the gallery.
Part 5. Use iPhone Built-in Recorder
If you want to record YouTube live stream from your iPhone, there is no need for an external YouTube live stream recorder app. iPhone comes with an inbuilt screen recorder that will help you to record any live stream video on YouTube app without any issue. The inbuilt screen recorder is readily available on iOS 11 and higher versions. You can access the recorder from Control Center. If it is not available, you can go to Settings> Control Center> Screen Recording and enable the screen recorder option. Here are the steps to record live stream video on YouTube.
Step 1: Open You Tube live stream video that you want to record.
Step 2: Go to the Control Centre on your iPhone and tap on Screen Recording icon.

Step 3: Tap on Start Recording option from the pop-up message. Make sure you turn off the microphone when you are recording someone’s YouTube live stream video.

Step 4: To stop recording, tap on the Red timer icon at the top-left corner.
![]()
Conclusion
Recording anyone’s live stream video on YouTube should no more be an issue on any device. We have stated the best YouTube live stream recorder apps for computer as well as mobile users. For desktop users, Filmora is the best YouTube live stream recorder whether you are recording your live stream session or someone you have subscribed on YouTube.
For macOS 10.12 or later
Step 1: Download and install Wondershare Filmora. Launch Filmora and click on New Project.
Step 2: Click on Record and select Record From Webcam if your YouTube live stream will be you speaking to your audience. Otherwise, you can select Record PC Screen if you are live streaming gameplay or screen activities. Here, we are considering Record PC Screen option which you can use to record someone’s YouTube live stream session as well.
Step 3: Choose the recording screen area and select the system audio and external mic audio sources properly. Turn on “Record Camera Stream” option if you want to capture your webcam along with the screen in PiP mode.
Step 4: Click on Record button to start recording as soon as you go live on YouTube. Press F9 key to stop recording when you end your live stream on YouTube. You can edit and export in the desired file format.
Part 2. Use QuickTime to Record YouTube Stream on Mac
If you are a Mac user, QuickTime Player comes pre-installed and it is the default media player. You can use QuickTime to record your screen activities when you go live on YouTube. You can also record someone’s live stream as well by playing it on your screen and recording the screen in the background with QuickTime. QuickTime is completely free and readily available for Mac users. There is no need for installing any third-party app. Here are the steps to record YouTube live stream with QuickTime.
Step 1: Open QuickTime Player from Applications folder. Go to File and then to New Screen Recording option.
Step 2: When YouTube live streaming session begins, click on the Record button from QuickTime floating widget.
Step 3: When the session gets over, click on Stop button. Go to File> Save option to save the recorded video on your hard drive.
Part 3. Use OBS Studio Stream Recorder
If you are a YouTuber yourself, you must have been using OBS Studio for YouTube live streaming. OBS Studio is the most popular platform for live streaming video on almost all online platforms where live streaming option is available. OBS Studio also lets you record your YouTube live streaming session as well as record others’ YouTube live sessions. OBS Studio is completely free to use and it is available for all desktop operating systems. Here are the steps to record YouTube live stream Windows 10 and Mac with OBS.
Step 1: Download and install OBS Studio as per your operating system. Launch the software after installation.
Step 2: Under Sources tab and click on “+” icon. Select Display Capture if you want to record your screen when you want to record someone’s live stream or your live stream where you are showing screen activities.
Step 3: You have to enter a name for the YouTube live stream capturing session and click on Ok button.
Step 4: You will see your screen video on the OBS window for confirmation that the connection is well established. Click on Start Recording button under Controls tab when you start your live streaming session on YouTube. OBS will keep recording your screen activities in the background.
Step 5: To stop recording, go to OBS Studio and click on Stop Recording. You can use the available Hotkeys to start and stop recording.
Part 4. Use AZ Screen Recorder on Android
If you have the latest version of Android, you might have an inbuilt screen recorder. But different Android smartphone comes with different Android version and the screen recorder may not be present. Hence, it is better to opt for YouTube live stream screen recorder app from Play Store. We recommend AZ Screen Recorder for recording your screen when you play YouTube live streaming video. Here are the steps to follow.
Step 1: Go to Google Play Store and install AZ Screen Recorder.
Step 2: Launch AZ Screen Recorder and allow the necessary permissions. It comes in the form of a widget with floating buttons on the side of the screen. Tap on the gear icon for video settings.
Step 3: Open YouTube live streaming video and tap on the Red Record button on AZ Screen Recorder widget to start recording.
Step 4: To stop the recording once the live stream is over, you have to tap on AZ screen recorder widget icon. Tap on Stop icon and the recorded video will be available in the gallery.
Part 5. Use iPhone Built-in Recorder
If you want to record YouTube live stream from your iPhone, there is no need for an external YouTube live stream recorder app. iPhone comes with an inbuilt screen recorder that will help you to record any live stream video on YouTube app without any issue. The inbuilt screen recorder is readily available on iOS 11 and higher versions. You can access the recorder from Control Center. If it is not available, you can go to Settings> Control Center> Screen Recording and enable the screen recorder option. Here are the steps to record live stream video on YouTube.
Step 1: Open You Tube live stream video that you want to record.
Step 2: Go to the Control Centre on your iPhone and tap on Screen Recording icon.
Step 3: Tap on Start Recording option from the pop-up message. Make sure you turn off the microphone when you are recording someone’s YouTube live stream video.
Step 4: To stop recording, tap on the Red timer icon at the top-left corner.
![]()
Conclusion
Recording anyone’s live stream video on YouTube should no more be an issue on any device. We have stated the best YouTube live stream recorder apps for computer as well as mobile users. For desktop users, Filmora is the best YouTube live stream recorder whether you are recording your live stream session or someone you have subscribed on YouTube.
Also read:
- [New] 2024 Approved TOP 5 Free Screen Recorder Extensions for Chromebooks
- [New] FREE Top 10 Best Drawing Software for Mac
- [New] In 2024, Your Picks for the Best Photo/Video Makers That Tune in Music
- [Updated] 2024 Approved Essential Audio Interface Guide for Podcasters
- [Updated] In 2024, Prime Videobg Selections Enhancing Remote Collaboration
- [Updated] Kickstarting with a GoPro Unbox the Perfect Add-Ons
- Creating Engaging Slideshows on TikTok: A Step-by-Step Guide
- Does PokeGo++ still work on Apple iPhone XS/iPad? | Dr.fone
- How To Get Your Windows PC's Spotify App Back Up and Running Again
- In 2024, The Easy Way to Screen Record - Your Ultimate Guide on Mi 11
- The Ultimate Method for Recording YouTube Videos on Any Device
- Title: Universal Techniques for Streaming to Disk From YouTube
- Author: Catherine
- Created at : 2025-01-23 21:56:48
- Updated at : 2025-01-26 00:58:16
- Link: https://desktop-recording.techidaily.com/universal-techniques-for-streaming-to-disk-from-youtube/
- License: This work is licensed under CC BY-NC-SA 4.0.